
The Complete Guide on How to Level an RV at a Campsite
This post contains affiliate links. As an Amazon Associate, we earn from qualifying purchases.
To level an RV at a campsite, you must first correct the rig’s angle using leveling gear under the tires or jacks, then reduce movement with stabilizer jacks. For automatic systems like the LCI Level-Up, the coach needs 12.7V DC to start and will fault on slopes exceeding 3.5 degrees front-to-rear or side-to-side. Skipping this order and using stabilizers to lift the rig bends brackets and leaves you unlevel.
That 3.5-degree limit is a hard line. It’s printed in the Lippert manual because the hydraulic jacks only have so much stroke, typically 15 to 16 inches. On a 40-foot motorhome, a 3.5-degree tilt means one end is over two feet lower than the other. The system’s math says no.
What follows: the step-by-step split for manual blocks versus auto-level, the voltage and fluid specs the manual assumes you know, and the one setup mistake that accounts for most first-season repair bills.
Key Takeaways
- Leveling fixes angle; stabilizing stops movement. Using stabilizer jacks to lift the RV bends them and stresses the frame.
- Automatic leveling systems like LCI Level-Up require 12.7V DC at the power unit to begin. If voltage is low, run the engine.
- The system will display “EXCESS ANGLE” and refuse to operate if the RV is more than 3.5 degrees out of level in any direction.
- For manual leveling, always level front-to-rear first, then side-to-side. Jacks work in pairs (front, rear, left, right).
- On soft ground, use load distribution pads under each jack foot. Asphalt softens in heat, and ice lets footpads slip.
The Critical Difference Between Leveling and Stabilizing
Confusing these two jobs is the most damaging, and most common. RV setup mistake. New owners feel the rig rock, crank down the stabilizer jacks, and think they’re done. They’ve just stabilized an unlevel RV.
Leveling corrects the angle of the RV floor. Stabilizing reduces movement after the RV is already parked and level. They are separate tasks with different gear, performed in a specific order.
A stabilizer jack is a thin, often telescoping leg designed to limit side-to-side sway. Its mounting brackets are welded to the frame but are not engineered for the vertical lifting force required to level several tons of vehicle. Using them that way cracks welds, bends the leg, and still leaves your refrigerator door swinging open.
The correct order is non-negotiable: position the RV, level it, then deploy stabilizers. This applies to every rig type, travel trailers, fifth wheels, motorhomes. Your first piece of gear is always something that changes the height of the tires or the primary leveling jacks: leveling blocks, ramps, or an automatic hydraulic system.
How to Level an RV Manually: Blocks, Ramps, and Landing Gear
For trailers and motorhomes without auto-leveling, manual leveling relies on physical blocks or ramps under the tires. The goal is a flat floor, not necessarily a perfectly level exterior. Use a simple bubble level placed on the floor inside.
| Gear Type | Best For | Risk If Skipped |
|---|---|---|
| Plastic Leveling Blocks | Travel trailers, small rigs, minor corrections | Blocks can split under heavy loads; stacking too high makes them unstable. |
| Curved Drive-On Ramps | Motorhomes, larger rigs, frequent use | Ramps can slide on gravel or grass if not anchored, letting the tire roll off. |
| Landing Gear (Fifth Wheels) | Supporting the front after unhitching | Cranking one side higher than the other twists the frame before the rig lifts. |
The process is front-to-rear, then side-to-side. 1. Park with the low side forward. If your front is lower than your rear, you’ll need fewer blocks. This is especially critical for dry camping on uneven terrain. 2. Chock the downhill wheels first. Before any lifting, wedge wheel chocks against the tires on the low side to prevent rolling. 3. Level front-to-rear. Drive the front tires onto blocks or a ramp until your interior level shows centered. For a fifth wheel, use the electric or manual landing gear crank, turning each side evenly. 4. Level side-to-side. Now address the left/right tilt. Drive the low-side tires onto blocks. If you’re using individual blocks, stack them in a staggered pattern like bricks for stability.
Common mistake: Cranking the landing gear unevenly. Turn each crank the same number of times, alternating sides every few rotations. A twisted frame makes slide-outs bind and doors stick.
Once the floor is level, deploy your stabilizer jacks to reduce shake. They are now taking minimal load, which is their designed job. This manual process directly supports a self-sufficient camping without hookups lifestyle, where perfect campsites are rare.
Automatic Leveling: Operating an LCI Level-Up System
Systems like the LCI Level-Up turn a 15-minute chore into a button press. But they have strict electrical and environmental requirements. Treating them like magic leads to “Unable to Finish Leveling” errors.
The control pad logic is simple: press ON, ensure the park brake is engaged, press AUTO LEVEL. The system grounds the jacks on the lowest corner first, lifts that end, then repeats until the coach is level. A green light signals completion.
The coach requires 12.7V DC at the power unit to begin the auto-leveling function. If voltage is below 12.7V DC, run the engine.
That voltage threshold is why a weak RV battery can leave you stranded off-level. The hydraulic pump draws a heavy amperage spike. Before you level, check your battery’s state of charge. A supporting RV generator or healthy solar power system is often the difference between success and a “Low Voltage” error.
Manual override mode exists if the auto cycle fails. You select MANUAL LEVEL on the pad, then use the FRONT, REAR, LEFT, and RIGHT buttons to ground and lift pairs of jacks in sequence. The manual dictates: front jacks first until they lift the coach 1-2 inches, then rear jacks until level, then left or right jacks to correct side tilt.
The 3.5-Degree Slope That Breaks Auto-Level
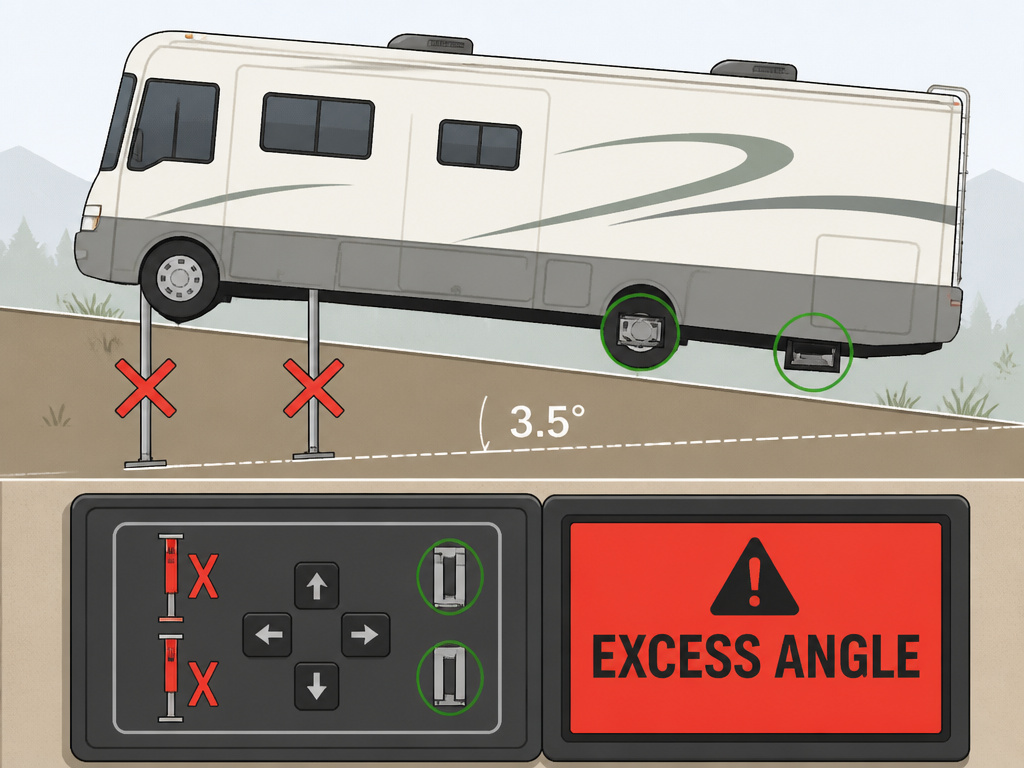
This is the system’s physical limit. The LCI Level-Up owner’s manual states the “EXCESS ANGLE” error triggers if the coach is 3.5 degrees out of level front-to-rear or side-to-side.
Why that number? Hydraulic jacks have a maximum stroke, usually 15 to 16 inches. On a severe slope, the low-side jacks would need to extend beyond their mechanical limit to reach the ground, or the high-side jacks would fully retract and still not make contact. The system’s sensors detect this impossible geometry and abort.
| RV Length | Height Difference at 3.5° Slope | Likely Outcome |
|---|---|---|
| 25 ft | ~18 inches | System may attempt but could timeout. |
| 35 ft | ~25 inches | “EXCESS ANGLE” error. Jack stroke insufficient. |
| 40 ft | ~29 inches | Immediate “EXCESS ANGLE”. Must reposition rig. |
The fix is to move the RV to a more level patch of ground. Sometimes pulling forward or back three feet is enough. This limit is why seasoned drivers scout the site on foot before parking, judging the slope with their eyes or a phone app.
Where this goes sideways: Ignoring the error and trying manual mode to force it. You might get the jacks down, but they’ll be at the extreme end of their stroke, bearing maximum load. The pump will run hot, and you risk a “Jack Timeout” or “Latched Retract/Service” alarm.
Surface Prep and Jack Pads: Non-Negotiables
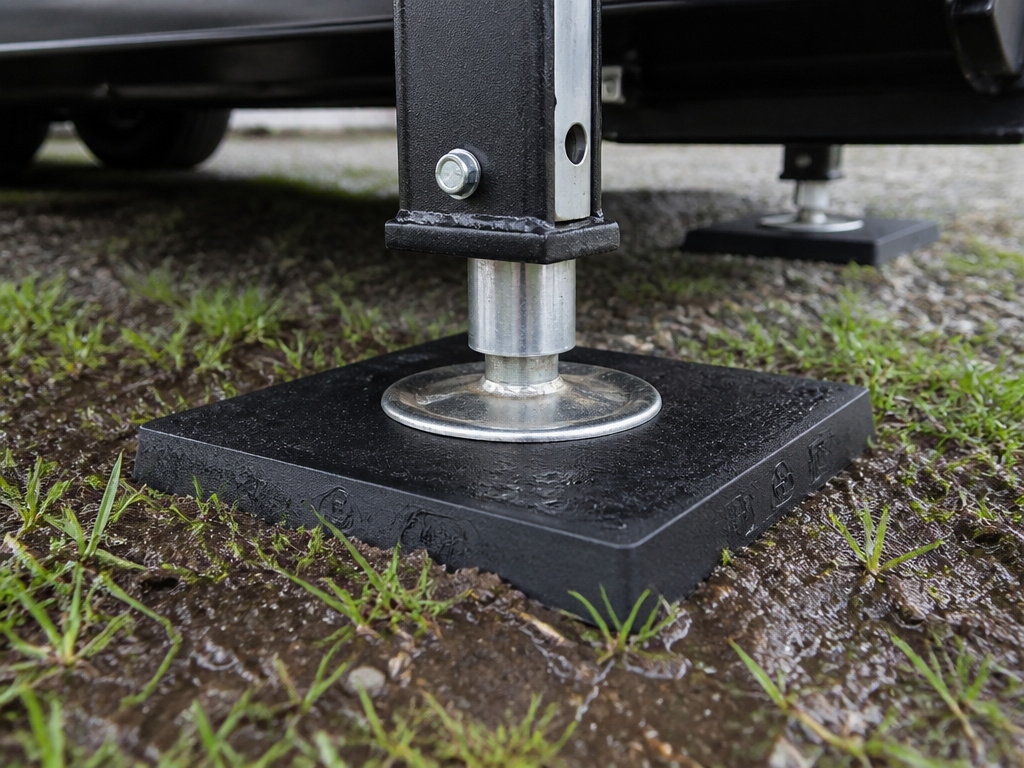
Automatic leveling feels advanced, but physics still applies. The standard 9-inch diameter footpad exerts about 15 PSI on typical soil. On soft ground, that’s a recipe for sinking.
The solution is a load distribution pad under each jack. A simple 12-inch square of composite board triples the surface area, dropping the ground pressure to a safe 5 PSI. Use them on: * Grass or loose gravel * Wet soil after rain * Hot asphalt (the pads insulate the heat and prevent sinking) * Icy or slick surfaces (for grip)
Never lift all wheels off the ground. The manual states this creates an unstable, unsafe condition. The Level-Up is a leveling system, not a jack stand for tire changes or repairs.
This kind of proactive ground prep is part of a broader mindset of maintaining your RV roof and systems, small preventative steps avoid big problems. It also protects your investment in other gear, like the RV surge protector guarding your electrical system.
Cold Weather and Hydraulic Fluid Reality
Below 10°F, the system slows down. The owner’s manual notes that “leveling jacks may extend and retract slowly due to the fluid’s molecular nature.” The factory-fill is Type A Automatic Transmission Fluid (ATF).
For reliable cold-weather operation, Lippert recommends ATF with Dexron III or Mercon V specifications. These fluids are formulated for a wider temperature range. Critically, Type E and Type F ATF are NOT compatible and will damage the hydraulic seals.
Check the fluid level with the jacks fully retracted. It should be within 1/2 inch of the reservoir top. Low fluid introduces air, causing sluggish operation and potential pump damage.
Routine maintenance includes wiping down the exposed jack rods and spraying them with a silicone lubricant every three months to prevent corrosion. This is as essential as checking your RV water filter or applying a fresh RV roof sealant.
Special Case: Leveling a Class A Motorhome
The geometry of a front-engine diesel pusher adds a rule. The parking brake only locks the rear drive wheels. If you park with the front end high and the system needs to lift the rear to level, those rear wheels can leave the ground.
A coach with its drive wheels off the pavement is unstable. The manual warns against it.
The practiced method is to park with the front end downhill. This puts the low corners at the front. The auto-level system then raises the front of the coach, keeping the braked rear wheels firmly planted. It’s a small positioning trick that eliminates a major safety risk.
Before You Go
Leveling is the first, most important campsite task. Get it wrong, and everything from your fridge to your slide-outs suffers. Remember the hierarchy: correct the angle with leveling gear first, then dampen movement with stabilizers.
For automatic systems, respect the 12.7V minimum and the 3.5-degree slope limit. No amount of button pressing overcomes low voltage or insufficient jack stroke. Always use jack pads on anything softer than concrete.
The goal is a solid, flat foundation for your camp. That stability lets everything else, from your protective coatings overhead to your peace of mind inside, work as designed.
Frequently Asked Questions
Can I use my auto-leveling system to change a tire?
No. The LCI Level-Up owner’s manual explicitly states the system is for leveling only and should not be used for service underneath the coach. Lifting all wheels off the ground is unsafe and voids the warranty. Use proper jack stands designed for the vehicle’s weight.
Why does my system keep showing “Low Voltage” even with the engine running?
The voltage is measured at the power unit, not the starter battery. A failing connection, corroded ground, or undersized wiring between the battery and the leveling system can cause a voltage drop under the pump’s heavy load. Check all terminals for corrosion and tighten connections.
My rig is level, but it still rocks when we walk around. What’s wrong?
This is normal. Leveling fixes the angle; it does not eliminate all movement. The remaining flex is why you deploy stabilizer jacks after leveling. For even more rigidity, consider additional tools like X-chocks between the tires or a king pin tripod for a fifth wheel.
How often should I check the hydraulic fluid?
Check it at the start of each camping season and after every 50-100 hours of system operation. Look for the fluid level in the reservoir with jacks fully up. Top up only with recommended Dexron III/Mercon V ATF to the 1/2-inch-from-top mark.
Is it okay to level with the slide-outs extended?
Almost never. Extending a slide on an unlevel RV puts twisting stress on the mechanism, seals, and frame. The standard procedure is to level the RV first, ensure it’s stable, then extend the slides. Always consult your specific RV’s manual, as some high-end systems can compensate.
