
The Correct Tire Pressure for a Bicycle: A Complete Guide
This post contains affiliate links. As an Amazon Associate, we earn from qualifying purchases.
Correct bicycle tire pressure depends on five variables: tire width, rider weight, bike load, terrain or road surface, and whether you run tubes or tubeless. For a typical 70 kg road rider on 25C tires, a starting point is 90 psi (6.2 bar) rear and 85 psi (5.8 bar) front. Go up for weight or smooth tarmac; drop it for comfort, grip, or rough surfaces.
That starting number is useless without the other four. A pressure that rolls fast on glass-smooth asphalt will beat you up on chip-seal and bounce dangerously in the rain. The spec printed on your tire sidewall is a maximum, not a recommendation, exceed it and you risk a blowout; run it and you’ll likely be overinflated.
What follows: the five pressure variables decoded with manufacturer tables, the tools you need to measure them, and the adjustments for weather, tubeless, and hookless rims. By the end you’ll toss the old “pinch test” and set pressure by the numbers.
Key Takeaways
- Your weight and tire width dictate the baseline. Heavier riders or narrower tires need higher pressure.
- Tubeless and hookless rim systems allow running 10-15 psi lower than traditional setups for better comfort and grip.
- Pressure drops over time, check before every ride. A tube-type tire can lose 1 bar (14.5 psi) in a week.
- In wet conditions, drop pressure by 1-2 psi (0.1-0.2 bar) to increase the tire’s contact patch and improve safety.
- The correct pressure is the lowest that avoids pinch flats and rim strikes while feeling fast and controlled to you.
The 5 Variables Your Correct Pressure Depends On
Forget the one-size-fits-all chart. Your pressure is a balancing act between five factors. Miss one and the ride suffers.
1. Tire Width and Construction
Wider tires run lower pressures. A 28C tire needs about 15 psi less than a 25C tire at the same rider weight. The physics is simple: a larger air volume supports the load over a bigger area, requiring less force per square inch.
Construction matters too. A high-end, supple-casings tire like the Schwalbe Pro One TLE can run lower pressure for the same support than a stiff, heavy-duty touring tire. Manufacturer pressure tables are specific to their tire models for a reason.
Common mistake: Running the maximum PSI printed on the tire sidewall. That number is the safe ceiling for the tire carcass, not the ideal pressure for your setup. Hitting it often means an overinflated, harsh, and skittish ride.
2. Rider Weight and Total System Load
This is the non-negotiable input. Pressure scales with load. Every major manufacturer. Schwalbe, Michelin, Giant, publishes weight-based tables.
| Rider Weight (kg) | 25-622 Tire (Pressure Front/Rear – bar) | 28-622 Tire (Pressure Front/Rear – bar) |
|---|---|---|
| 60-65 kg | 5.0 / 5.2 | 4.2 / 4.6 |
| 71-75 kg | 5.8 / 6.3 | 4.8 / 5.3 |
| 81-85 kg | 6.8 / 7.0 | 5.8 / 6.0 |
Table: Schwalbe Pro One TLE pressure recommendations on a 19mm internal width rim (Source: Schwalbe Road Bike Technology).
Total load means you plus the bike plus anything you’re carrying. Giant Road WheelSystems have a load limit of 129 kg. If you tour with panniers, add that weight and bump pressure accordingly. A good tire pressure gauge is essential for this, guessing by hand is notoriously inaccurate.
3. Terrain and Riding Surface
Smooth asphalt rewards higher pressure for lower rolling resistance. Chip-seal, cobbles, or gravel demand lower pressure to absorb vibrations and maintain grip.
Pirelli categorizes general ranges: Road (4-7 bar / 60-105 psi), Gravel (2-5 bar / 30-75 psi), MTB (1.5-2.5 bar / 20-35 psi). These are starting points. On MTB tires, Michelin notes an exception: for very soft terrain like sand or mud, dropping pressure further can actually improve rolling efficiency by letting the tire float on top rather than dig in.
The rule of thumb: the rougher the surface, the lower you go.
4. Tube-Type vs. Tubeless Setup
This changes everything. A tube-type tire (with an inner tube) is simpler but more prone to pinch flats at low pressure. You must keep pressure high enough to protect the tube from pinching against the rim on impacts.
A tubeless setup, where sealant inside the tire seals punctures, allows much lower running pressures. Without a tube to pinch, you can drop pressure for comfort and grip without the constant fear of a “snakebite” flat. Pirelli states tubeless setups need more maintenance, sealant checks every two to three months, but reward it with performance.
5. Rim Type: Hooked vs. Hookless
Modern hookless rims (rims without a retaining bead hook) are common in high-end road and gravel wheels. They require compatible tires and strictly enforced pressure limits.
Giant explicitly advises taking advantage of hookless technology by running 10-15 psi (0.7-1.0 bar) less than conventional wisdom. Their calculator is built around this principle. The lower pressure increases the tire’s contact patch and compliance. Ignore the rim’s max pressure rating at your peril, exceed it and the tire can blow off the rim.
How to Check and Adjust Your Tire Pressure
You need the right tools. A floor pump with a gauge is the baseline. A standalone digital tire pressure gauge is more precise for fine-tuning.
The Step-by-Step Pressure Set
- Find your starting point. Use a manufacturer calculator (like Giant’s) or a published table for your tire model and weight. Write it down.
- Inflate the tire. Use your floor pump to reach the target pressure. Listen for the click of the tire bead seating evenly around the rim.
- Check with a precision gauge. A pump gauge can be off by 5-10 psi. Verify with a standalone accurate pressure gauge and adjust.
- Test ride and assess. Does the bike feel harsh and skittery on bumps? Drop pressure 3-5 psi. Does it feel sluggish or do you feel rim strikes? Add 3-5 psi.
- Note your final numbers. Pressure front and rear will differ. The rear typically takes 5-10 psi more due to weight distribution.
I won’t recommend a specific pressure for you. The tables give a science-backed start, but your perfect number lives in the subjective space between “too hard” and “too soft.” It takes a couple of rides to find it.
Where this goes sideways: Adding air without measuring. A few pumps from a portable tire inflator can add 15 psi. You go from dialed to overinflated before the gauge even comes out.
Fine-Tuning for Conditions: Wet, Cold, and Loaded Rides
Your perfect fair-weather pressure isn’t static. Conditions change, and so should your PSI.
Wet Roads and Rain
Water reduces grip. Pirelli recommends lowering pressure by 0.2 bar (1-2 psi) in the wet. The lower pressure increases the tire’s contact patch, pushing more water through the tread sipes and improving safety. It’s a small adjustment with a tangible effect.
Temperature Changes
Air pressure changes with temperature. A rule from the motorsport world applies: for every 10°F (5.5°C) drop in ambient temperature, tire pressure falls about 2%. A tire set to 90 psi at 70°F will read about 85 psi at 50°F. Check and adjust with the seasons.
Carrying Extra Load
Commuting with a backpack or touring with bags adds weight. Calculate the extra load and increase pressure proportionally. If you’re 75 kg and your gear is 10 kg, use the pressure recommendation for 85 kg. This prevents excessive tire squirm and sidewall wear.
Common Pressure Mistakes and Their Consequences
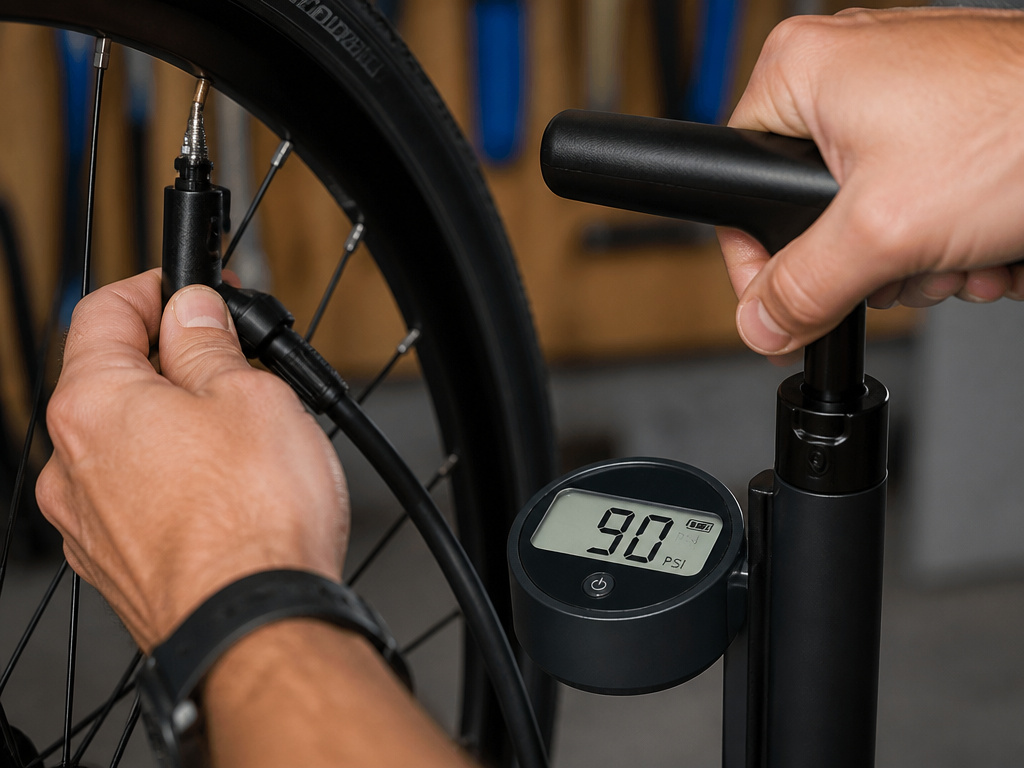
Getting pressure wrong has immediate and long-term costs.
| Mistake | Short-Term Consequence | Long-Term Damage |
|---|---|---|
| Overinflation | Harsh ride, loss of grip on bumps, increased puncture risk from debris. | Accelerated center-tread wear, compromised tire casing integrity. |
| Underinflation | Feeling of sluggishness, tire “squirminess” in corners, pinch flats (tube-type). | Sidewall cracking, rim damage from impacts, overheated tire carcass on long descents. |
| Ignoring Rear/Front Difference | Poor handling balance, either twitchy front end or vague steering. | Uneven wear patterns between front and rear tires. |
| Not Checking Regularly | Gradual performance loss, increased rolling resistance. | Chronic underinflation wears sidewalls and stresses rim beds. |
The most common error is not checking often enough. Tube-type tires are not perfectly airtight. As Pirelli notes, air molecules pass through the rubber at a microscopic level. You can lose 1 bar (14.5 psi) in a week without a puncture. That turns a perfectly set 90 psi tire into a sluggish, vulnerable 75 psi tire by your next weekend ride.
A reliable bicycle floor pump with a good gauge on your workshop wall is the best defense. Make checking pressure part of your pre-ride ritual, like putting on your helmet.
Tubeless and Hookless: Special Considerations
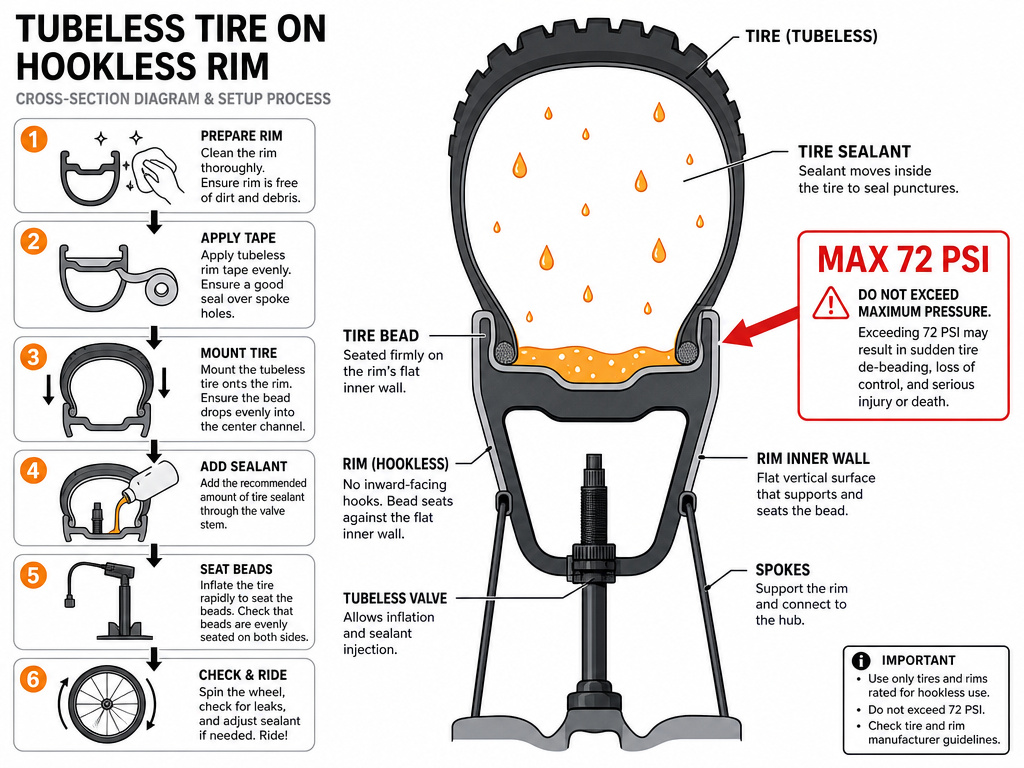
If your bike runs modern systems, the old rules don’t apply.
Tubeless Pressure Strategy
The beauty of tubeless is the ability to run low. Without a tube, the primary failure mode from low pressure, the pinch flat, is eliminated. You can run pressures that would instantly flat a tube-type setup.
Start 10-15 psi lower than a comparable tube setup. The tire will conform to the road better, smoothing vibrations and increasing grip. You’ll need tire sealant inside, and you must check its level every few months as it dries out. A puncture sealant like Stan’s or Orange Seal is part of the system, not an optional extra.
The Hookless Rim Rulebook
Hookless rims are unforgiving. The tire is held on by pressure alone. Every hookless rim has a maximum pressure rating, often 72 psi (5 bar) for road, lower for gravel. This is an absolute limit, not a target.
Easy to miss: The tire’s max pressure is irrelevant if the rim’s is lower. Always obey the rim’s rating. A tire rated for 110 psi on a hookless rim rated for 72 psi must never exceed 72 psi.
Giant’s advice to run lower pressures with hookless isn’t just a performance tip, it’s the design intent. Use their calculator or one from your rim manufacturer.
Frequently Asked Questions
Should front and rear tire pressure be the same?
No. The rear tire carries more weight, typically 55-60% of the total system load. It needs higher pressure. A common differential is 5-10 psi more in the rear. For a 70 kg rider, that might mean 85 psi front, 90 psi rear.
How often should I check my bicycle tire pressure?
Check before every ride. Air loss is constant, and a 5 psi drop affects handling and rolling resistance. For intensive use like daily commuting, check twice a week. A home pump with a built-in gauge makes this a 30-second task.
Can I use the tire’s sidewall max PSI as my pressure?
Never. The sidewall max PSI is the tire’s safety limit, not a performance recommendation. Running at that pressure will almost always result in an overinflated, uncomfortable, and less grippy ride. Always use a weight and width-based calculation.
Does tire pressure affect puncture risk?
Yes, significantly. Overinflation makes the tire hard and less able to conform around sharp objects, driving debris into the casing. Underinflation allows the tire to compress too much, pinching the tube against the rim on impacts (for tube-type) or allowing the rim to strike the ground. The correct pressure band minimizes both risks.
What’s the best way to add air if I don’t have a floor pump?
CO2 inflator is fast and portable for roadside repairs but wasteful for regular adjustments. A hand pump works in a pinch but is labor-intensive. For home use, a quality floor pump is a non-negotiable investment. Trying to inflate a car tire with a bicycle pump** illustrates the limit, possible in an emergency, but miserable for routine use.
The Bottom Line
Stop guessing. The correct tire pressure is a formula: your weight, your tire size, your terrain, and your equipment. Start with the manufacturer’s numbers. Schwalbe, Giant, and Michelin publish them for a reason. Then adjust for feel.
Invest in a good floor pump and a digital tire pressure gauge. Check pressure weekly, drop a few PSI for rain, and embrace lower pressures if you switch to tubeless. Your bike will roll faster, grip harder, and feel like it finally fits you.
