
Master How to Adjust Bicycle Brakes and Eliminate Pad Rub
This post contains affiliate links. As an Amazon Associate, we earn from qualifying purchases.
To adjust bicycle brakes, you fix two things: cable tension and pad alignment. Tighten the barrel adjuster or the cable anchor bolt to bring the pads closer to the rim or rotor, and center the caliper so both pads engage evenly. If the lever pulls to the bar, the cable has stretched; if one pad rubs, the caliper is off-center.
That cable stretch is where nine out of ten riders lose their brake feel. A cable doesn’t snap overnight. It yields a millimeter per ride until your lever travel doubles and you’re squeezing the bar at every stop. The barrel adjuster exists for exactly this.
The rest of this guide walks through cable brakes, disc brakes, and the one symptom that means a trip to the shop. You’ll have a wrench in your hand in five minutes.
Key Takeaways
- Turn the barrel adjuster counter-clockwise to take up slack and bring the brake lever closer to the bar. Clockwise backs the pads away from the rim.
- A brake pad is done when its thickness hits 0.5 mm. Worn pads eat up lever travel no amount of cable tightening can fix.
- Center the caliper before touching cable tension. A misaligned caliper causes one-sided pad rub and weak braking even with a tight cable.
- Hydraulic disc brakes lack barrel adjusters. A spongy lever or pull-to-the-bar feel means air in the system, it needs bleeding, not tuning.
- After any adjustment, spin the wheel and pull the lever hard a dozen times. The system settles in the first few actuations, and what felt tight can go slack again.
Brake Adjustment Starts With Diagnosis
You don’t grab a wrench first. You identify which of three basic problems you’re solving. The lever feel tells you.
If the brake lever pulls almost to the handlebar before the bike slows, the cable is too loose. Cables stretch with use, and pad wear consumes extra length. If the brake pads rub against the rim or rotor even when you’re not braking, the caliper is misaligned or the cable is too tight. And if the lever feels soft or spongy and sinks toward the bar under constant pressure, you’re likely dealing with air in a hydraulic system.
Spin the wheel and watch the gap between the pad and the braking surface. On rim brakes, you want about 3 mm of daylight. On mechanical disc brakes, Shimano’s dealer manual specifies a 0.2 mm to 0.4 mm gap between each pad and the rotor. One pad much closer than the other means the caliper is crooked.
A brake arm contacting the caliper when the lever is pulled means either the inboard pad clearance is too large, or the pads have worn down to the 0.5 mm replacement limit. Adjusting a brake with shot pads just moves the problem downstream.
The tools you need depend on your brake type. For most cable-operated rim and disc brakes, a set of Allen keys (typically 4mm and 5mm) and a screwdriver for caliper spring tension screws will cover it. For cable adjustments, a Park Tool CN-10 cable cutter is the professional standard for a clean end trim. If you’re dealing with hydraulic brakes, you’ll need a bleed kit specific to your brand. Shimano, SRAM, and Magura all use different fittings and fluids.
The Cable and Barrel Adjuster Method (The 60-Second Fix)
Most brake problems start here. The barrel adjuster is the threaded collar where the cable housing meets the brake lever or the brake caliper. Turning it changes the effective cable length without touching the anchor bolt.
Turn the barrel adjuster counter-clockwise to tighten the brake. This screws the adjuster outward, pulling more cable through the housing and moving the brake pads closer to the rim or rotor. Each quarter-turn makes a noticeable difference in lever position. If your pads are rubbing, turn the adjuster clockwise to loosen the cable and open the gap.
If the barrel adjuster is maxed out, threaded all the way out and still too loose, you need to reset it. Unscrew it fully clockwise until it’s seated, giving yourself back the full range of adjustment. Now you move to the cable anchor bolt.
Loosen the bolt clamping the cable end at the brake caliper just enough to pull cable through. With one hand, squeeze the brake pads firmly against the rim or rotor. Hold them there while you re-tighten the anchor bolt to 6–8 Nm of torque. This manually takes up all the slack. Now use the barrel adjuster for fine-tuning.
Common mistake: Adjusting only one side of a dual-pivot caliper. This throws the centering off and guarantees pad rub on the next ride. Always adjust cable tension with the caliper centered.
For brakes like Shimano’s BR-CX77 or BR-R517, this process is straightforward. Their outboard pad adjusts via the barrel or a dedicated arm screw, while the inboard pad uses a separate adjustment screw. The goal is equal clearance on both sides.
Adjusting Rim Brake Calipers
Rim brakes come in three main flavors: side-pull calipers, V-brakes, and cantilevers. The centering process is similar for all.
| Brake Type | Primary Adjustment | Centering Method | Unique Failure Point |
|---|---|---|---|
| Side-Pull Caliper | Barrel adjuster at lever | Small screw at caliper pivot | Pivot seizes with dirt; pads toe-in wears unevenly |
| V-Brakes | Barrel adjuster at noodle | Spring tension screws on each arm | Noodle pops out of holder; arms bend on impact |
| Cantilever Brakes | Cable yoke adjustment | Spring tension screws | Straddle cable rusts and frays at the crimp |
First, ensure the wheel is straight in the dropouts and the quick-release or thru-axle is tight. A crooked wheel makes perfect brake adjustment impossible.
For side-pull calipers, look for a small Phillips or Allen screw on the caliper body, often at the top of the pivot. Turning this screw shifts the entire caliper left or right. Adjust until the gap between each pad and the rim is even. V-brakes and cantilevers use two separate spring tension screws, one on each brake arm. Turning a screw clockwise increases that arm’s spring tension, pulling that pad away from the rim.
A proper setup has the pads contacting the rim squarely, with the leading edge maybe a millimeter closer than the trailing edge. This “toe-in” prevents brake squeal. You bend the pad holder slightly with an open-end wrench to set it.
Where this goes sideways: Replacing pads without checking toe-in. New flat-mounted pads will howl until you bend the holder to match the rim’s curve.
If the brake still feels soft after tension and centering, inspect the cable and housing. A kinked housing or a frayed cable inside the lever creates drag that no amount of tightening fixes. A full brake maintenance job, replacing cables and housing, is cheaper than a crash.
Adjusting Mechanical Disc Brakes
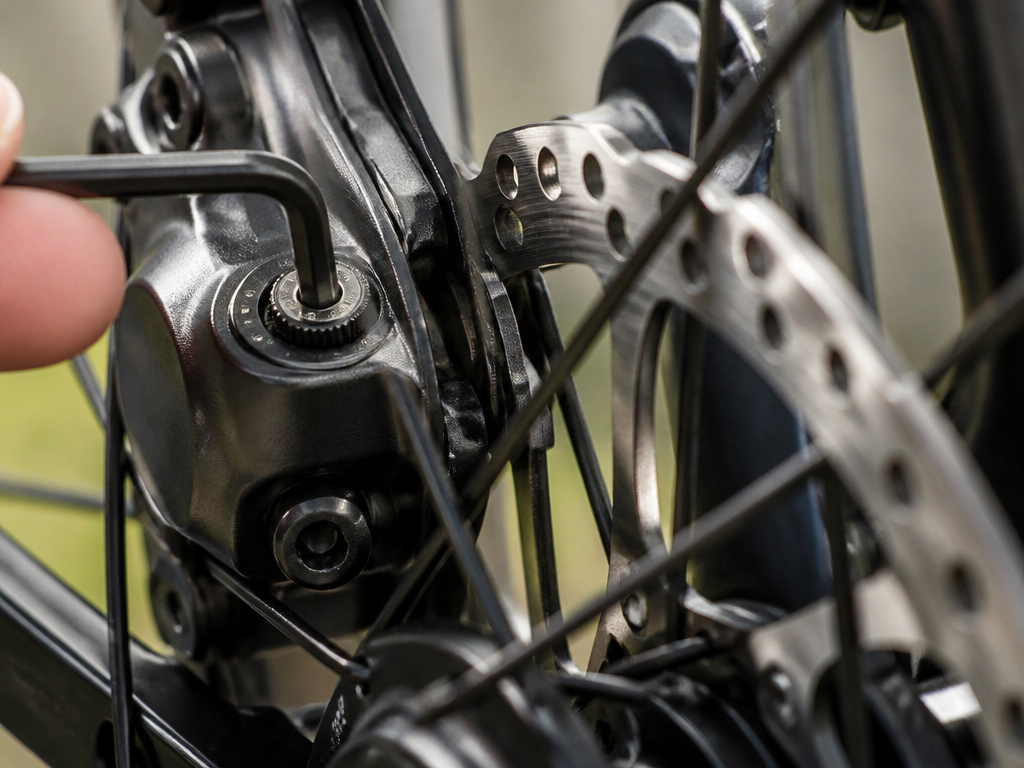 Mechanical disc brakes, like the Shimano BR-CX77 or an Avid BB7, have one moving pad and one static pad. The cable pulls the moving pad; the static pad is adjusted manually to set the baseline clearance.
Start with the static (inboard) pad. Reach through the spokes with an Allen key and turn the adjustment dial clockwise to move the pad closer to the rotor. Set it so there’s a hair’s breadth of clearance, you shouldn’t hear rubbing, but you want it close for strong bite. Shimano’s spec is that 0.2 mm to 0.4 mm gap.
Now set the moving (outboard) pad using the cable tension barrel adjuster or the caliper’s own adjuster. Squeeze the lever and watch the pad move. It should not push the rotor sideways. If it does, the caliper body needs alignment.
Loosen the two bolts that attach the caliper to the frame or fork mount, just enough that the caliper can slide. Squeeze the brake lever firmly and hold it. While holding the lever, re-tighten the mounting bolts to the manufacturer’s specified torque (usually 6–8 Nm). This centers the caliper over the rotor perfectly.
The part nobody mentions: After centering, re-check the static pad clearance. The centering process can shift the rotor slightly, closing the gap you just set.
The difference between a good mechanical disc brake and a great one often comes down to cable quality. A compressionless housing, like those from Jagwire or Shimano’s own polymer-lined options, makes the lever feel crisper and more direct. It’s a worthwhile upgrade over the basic coiled housing most bikes ship with.
When Adjustment Isn’t Enough: Pad Wear and Hydraulics
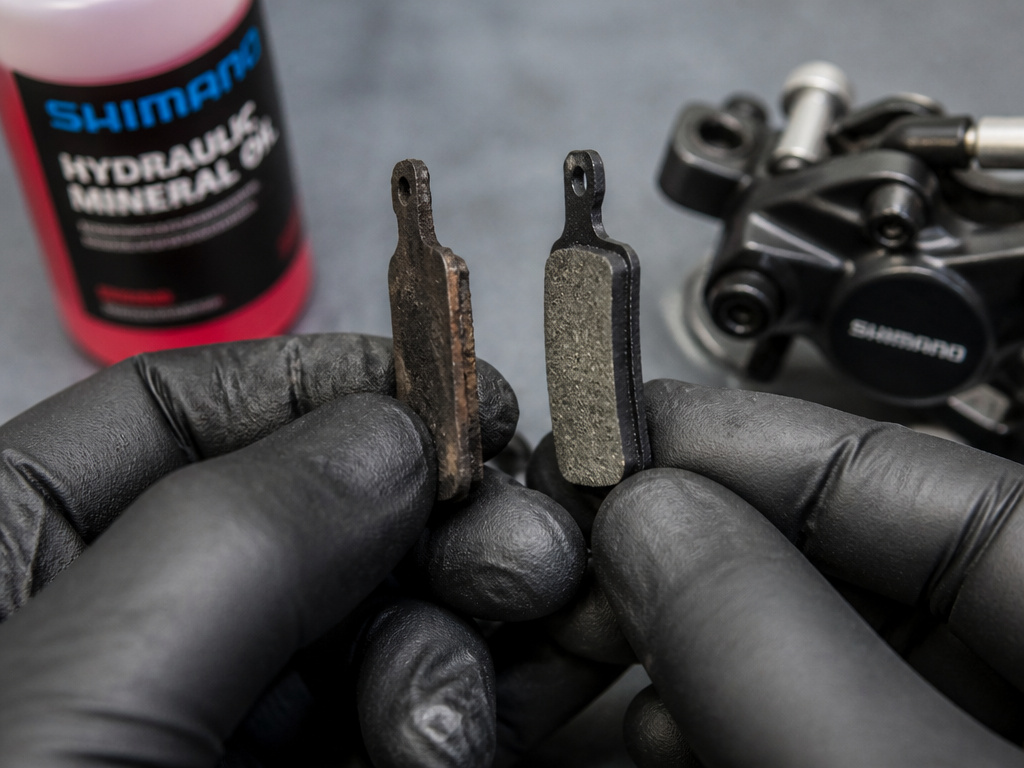 Brake pads are consumable. Worn pads are the number one reason barrel adjusters run out of travel. A new pad might be 4 mm thick; the replacement limit is 0.5 mm. As the pad wears, the piston or caliper arm has to move further to make contact, eating up your lever travel.
If you’ve taken up all the slack and the lever still comes back too far, look at the pads. Many have a wear indicator groove. If it’s gone, they’re done. Replacing them resets the system and gives you back your adjustment range. This is true for both rim brakes and disc systems.
Hydraulic disc brakes are a different animal. They self-adjust for pad wear, so they shouldn’t need regular cable-tension tweaks. If a hydraulic lever pulls to the bar or feels spongy, the problem is almost always air in the system or contaminated fluid. This requires bleeding, flushing the old fluid and air bubbles out with new, clean fluid. It’s a more involved procedure that needs specific tools and fluid types. For most riders, this is a shop job.
Skip this if: You own basic tools and are facing a spongy hydraulic brake. Bleeding requires precision; getting it wrong can mean no brakes at all. The Cycling UK brake adjustment video clearly marks this as a pro boundary.
Sometimes the issue is contamination, not air. If you’ve sprayed lubricant near the rotor or gotten oil on the pads, braking power vanishes. The fix is to clean the rotor with isopropyl alcohol and sand the pad surface lightly. If that doesn’t work, new pads and a thorough rotor clean are the only answer.
The Final Checks Before You Ride
You’ve tightened, centered, and replaced. Now you verify the work under real conditions.
Spin each wheel freely. There should be no rubbing from the brakes. Now, squeeze each brake lever firmly. The lever should engage well before it reaches the handlebar, about a third of its travel is ideal. Hold the lever tight for thirty seconds. It should not slowly sink toward the bar. If it does, there’s still air in a hydraulic system or the cable is slipping at the anchor bolt.
Take the bike for a slow, controlled test ride in a safe area. Apply the brakes progressively. They should feel firm and modulate easily, not grab suddenly or feel mushy. Listen for squealing or grinding, which indicates contaminated pads or misalignment.
A final, often overlooked step: bed-in new pads. For disc brakes, this means a series of moderate stops from low speed to transfer pad material evenly onto the rotor. It prevents noise and ensures peak braking power from the first real stop you need.
Your brakes are the most important safety system on the bike. A five-minute adjustment can be the difference between a confident stop and a close call. If anything feels off after your work, don’t ride it. A local bike shop can spot what you missed in minutes.
Frequently Asked Questions
Can I adjust brakes without any tools?
You can make minor adjustments using only the barrel adjuster, which is hand-turned. For any cable re-tensioning, centering, or pad replacement, you’ll need at least a set of Allen keys and a screwdriver.
Why do my brakes keep going out of adjustment?
Cables continue to stretch slightly for the first few rides after a fresh install. Also, if the cable anchor bolt wasn’t tightened sufficiently, it can slip under load. Finally, if the pads are near the end of their life, wear will quickly consume any slack you take up.
How do I know if I need new brake pads?
Look for a wear indicator groove. If it’s gone, the pad is worn. Measure the pad material thickness if you can. For rim brakes, replace them before the pad backing plate contacts the rim. For disc brakes, the minimum safe thickness is 0.5 mm. Also, listen for a metallic grinding sound, which means the backing plate is scraping the rotor.
What’s the difference between adjusting mechanical and hydraulic disc brakes?
Mechanical brakes use a cable and need periodic tension adjustment as the cable stretches and pads wear. Hydraulic brakes use fluid and self-adjust for pad wear. Hydraulic brakes only need adjustment if air enters the system (causing a spongy lever), which requires a bleed, not a simple turn of a barrel adjuster.
Is it safe to adjust my own brakes?
Yes, for cable-based systems. The procedures are straightforward and require basic tools. For hydraulic systems, if the issue is pad rub or lever reach, minor adjustments are safe. If the problem is a spongy lever or loss of pressure, bleeding the system involves special tools and fluid; many riders choose a shop for this.
The Bottom Line
Adjusting your brakes is regular maintenance, not a mystery. Start at the barrel adjuster for slack, center the caliper for rub, and replace pads when they’re thin. Cable brakes reward a methodical approach; hydraulic brakes mostly ask to be left alone until they need a bleed.
For most commuter and road bikes, a well-set pair of rim brakes is more than adequate. For mountain biking or wet conditions, the power and consistency of disc brake types are worth the extra complexity. The goal is the same: a lever that bites predictably, every time you pull it.
