
How to Maintain Your ATV Brakes | Critical Service Steps
This post contains affiliate links. As an Amazon Associate, we earn from qualifying purchases.
Maintaining ATV brakes requires a three-part routine: inspect fluid level and condition every 10 hours of operation, check pad and disc wear at each oil change, and test lever feel before every ride. The system is closed, so a dropping fluid level only means worn pads or a leak. Use only fresh, sealed DOT 3 or DOT 4 fluid as specified by your model’s manual.
That closed-system fact is the entire diagnostic. Fluid doesn’t evaporate. If the reservoir level falls, the volume has gone somewhere else. On a Honda TRX500, that volume is displaced by advancing pistons pushing worn pads. On any machine, it could also be weeping from a cracked hose or a loose banjo bolt. Your job is to find which one.
What follows is the inspection sequence that catches leaks before they become failures, the wear limits that tell you when to replace, and the one manufacturer warning about adding fluid that overrides every internet tutorial.
Key Takeaways
- Brake fluid is hygroscopic and degrades; use only fresh fluid from a sealed container to prevent internal corrosion and a spongy lever.
- Pad wear is the primary cause of dropping fluid levels in a healthy system. Ignoring it leads to metal-on-metal contact, scoring the disc.
- The Honda TRX680FA5K manual explicitly states “Do not add or replace brake fluid, except in an emergency.” Topping up without finding the root cause masks a leak.
- Regular inspections for leaks, pad thickness, and disc condition are non-negotiable. The alternative is brake fade when you need stopping power the most.
- After replacing pads, a proper burnishing procedure (20 cycles of moderate braking) is required to seat the new material and restore full friction.
The Three-Pillar Inspection Routine
Your brakes live or die by consistency. A haphazard look when something feels wrong is how you end up with no brakes at all. Build this three-part check into your regular maintenance schedule, right alongside your ATV oil change.
First, fluid level and condition. Do this every 10 operating hours or before any long ride. With the ATV on level ground, look at the transparent reservoir on the handlebar master cylinder. The fluid should sit between the upper and lower marks. More important than level is color. New DOT 4 fluid is almost clear with a slight amber tint. If yours looks like strong tea or coffee, it’s contaminated with moisture and must be flushed. That dark color signals absorbed water, which lowers the fluid’s boiling point and promotes internal corrosion.
Second, pad and disc inspection. Sync this with every other oil change. You don’t need to remove the caliper. Shine a light through the wheel spokes to see the pad material pressed against the disc. There should be visible thickness. If the material looks wafer-thin, or you see a deep groove worn into the disc itself, you’re past the warning stage.
The part nobody mentions: You’re looking for uneven wear. One pad wearing faster than its partner means a sticking caliper piston. That silent fault cooks the pad on one side and leaves the other nearly new, dragging constantly and killing performance.
Third, the operational feel test. Do this before you start the engine every single time. Squeeze the front brake lever. It should feel firm, with a small amount of free play before resistance builds. A lever that pulls to the handlebar is the classic sign of air in the system. A lever that feels stiff but offers little stopping power often points to glazed pads or a contaminated disc. This five-second test is your earliest warning.
How Often Should You Service ATV Brakes?
There is no universal calendar. Service intervals are driven by use, not the date. Aggressive trail riding in mud and water demands monthly checks. Light, dry farm work might stretch a season.
Follow this mechanical schedule, not a guess.
| Inspection | Frequency | What Happens If You Skip It |
|---|---|---|
| Lever Feel & Visual Leak Check | Before every ride | A small leak becomes a total failure mid-trail. A spongy lever won’t stop you on a downhill. |
| Fluid Level & Color | Every 10 operating hours | Old, watery fluid boils under heavy braking, causing complete brake fade and a runaway vehicle. |
| Pad Thickness | Every oil change (25-50 hrs) | Worn-out pads expose the metal backing plate, which gouges the expensive brake disc within one ride. |
| Full System Flush | Every 2 years or 200 hours | Internal corrosion from moisture damages the master cylinder and caliper pistons, leading to a very expensive rebuild. |
The 200-hour flush is critical. Even if the fluid looks okay, it has absorbed moisture from the air through microscopic pores in the rubber hoses. This water turns to steam under hard use. The result is a lever that sinks to the bar with no pressure.
Understanding Your Brake Fluid: DOT 3 vs. DOT 4
The manual has a specific answer. Using the wrong one is a quiet mistake with loud consequences.
Honda manuals are precise. The TRX500FE2H specifies Honda DOT 4 Brake Fluid. The TRX250TMJ approves Honda DOT 3 or DOT 4. They are not fully interchangeable. DOT 4 has a higher dry and wet boiling point than DOT 3. It handles the heat from prolonged downhill riding better. Using DOT 3 in a system designed for DOT 4 risks boiling the fluid sooner.
DOT 4 brake fluid absorbs moisture from the air about twice as fast as DOT 3. This is why an opened container is considered contaminated. That absorbed water corrodes steel brake lines and aluminum calipers from the inside out.
The rule is simple. Use what the manual says. If it says DOT 4, use DOT 4. If it allows either, DOT 4 is the better choice for any aggressive riding. Always buy a fresh, sealed bottle. Never use fluid from a container that’s been open for more than a day. This isn’t being fussy. It’s the difference between a firm lever and a dangerous mush.
Step-by-Step: Fluid Check and Top-Up
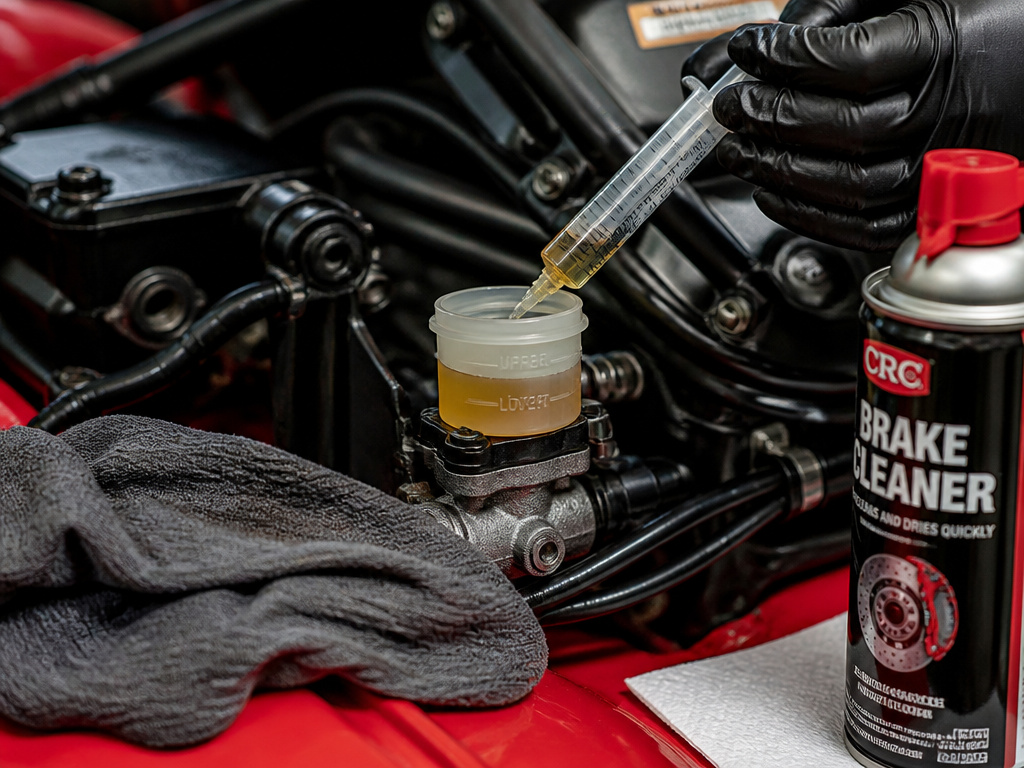 This is a corrective action, not routine maintenance. Topping up fluid without diagnosing the cause is treating a symptom.
Before you start: Brake fluid is a severe paint stripper. Cover your ATV’s plastics and painted surfaces with a rag. Have paper towels and brake cleaner ready. Wear safety glasses.
- Clean the reservoir. Wipe away all dirt from the master cylinder cover. You want zero grit falling into the open system.
- Check the level. View the reservoir. If the fluid is at or below the LOWER mark, you must investigate before adding. Look for pad wear first.
- Inspect the pads. If pads are thick, you likely have a leak. Trace the brake lines from the master cylinder to the caliper. Look for wetness, streaks, or swollen hose sections.
- Add fluid only if necessary. If pads are worn but safe, and no leak is found, you may add fluid to reach the UPPER mark. Use a clean funnel or a syringe.
- Critical: Pour slowly to avoid spills. Do not overfill. The fluid needs air space to expand as it heats.
- Securely close the reservoir. Ensure the diaphragm and seal are correctly seated before tightening the screws. Snug is enough; overtightening strips the plastic threads.
Where this goes sideways: Adding fluid to a system with a leak. You restore the level, feel safe, and the leak continues. You run dry when you next need the brakes. The Honda TRX680FA5K manual is blunt: only add fluid in an emergency, and see a dealer immediately after.
This procedure also applies when you’re performing other chassis work, like ensuring your ATV tire size is correct for optimal handling and clearance.
Replacing Brake Pads
 You see metal near the disc. Or the lever travel is too long even with full fluid. Time for new pads.
The tools are basic: a socket set, a C-clamp or piston press, brake cleaner, and a wire brush. New pads, of course. Always replace pads in axle sets—both front, or both rear.
- Remove the caliper. Loosen the mounting bolts (often 25 Nm / 18 ft-lbs) and slide the caliper off the disc. Hang it with a zip-tie or wire; don’t let it dangle by the brake hose.
- Push the piston back. This is the step people force. Insert the old pad against the piston. Use a C-clamp to slowly, evenly retract the piston into its bore. Forcing it cockeyed damages the piston seal. If the piston won’t budge, the caliper is seized and needs rebuilding.
- Install new pads. Clip the new pads into the caliper bracket. Ensure any wear sensor or anti-rattle hardware is transferred over.
- Re-mount the caliper. Slide it over the disc. The pads should center with a tiny gap. Tighten the mounting bolts to the specified torque.
- Burnish the pads. Before you trust them, you must seat them. Ride to a safe, open area. Accelerate to 30 mph, then apply moderate, steady brake pressure to slow to 5 mph. Release, accelerate, and repeat. Do this 20 times. This process transfers a thin layer of pad material onto the disc, establishing proper friction and heat management.
Skipping the burnish gives you weak, unpredictable braking for the first 50 miles. The pads need that heat cycle to cure.
Diagnosing Common ATV Brake Problems
Not every issue requires a full teardown. Here’s how to read the symptoms.
| Symptom | Likely Cause | Immediate Action |
|---|---|---|
| Spongy lever that pulls to bar | Air in hydraulic lines. | System needs bleeding. This is a two-person job or requires a vacuum bleeder. |
| Brake drag, wheel hard to spin | Sticking caliper piston or collapsed brake hose. | Check for a seized slider pin first. If free, the hose may be acting as a one-way valve; replace it. |
| Grinding noise | Pad material completely worn, metal backing plate contacting disc. | Stop riding immediately. Replace pads and inspect disc for deep scoring. |
| Brake fade (lever gets softer with use) | Old, moisture-contaminated fluid boiling. | Flush entire system with new, sealed fluid. |
| Leaking fluid at wheel or handlebar | Damaged seal, cracked hose, or loose fitting. | Identify source. Even a small leak means a full component replacement. Do not ride. |
A leaking system is a zero-tolerance failure. Fluid is incompressible; air is not. A leak introduces air, and air compresses under pressure, giving you that terrifying spongy feel.
When to Bleed Your Brake System
Bleeding removes air. You need to do it after opening the hydraulic system (like replacing a caliper or hose), or when the lever feels spongy despite full fluid.
You’ll need fresh fluid, a clear bleed hose, a catch bottle, and a wrench that fits the caliper’s bleed valve. The sequence is always: start with the caliper farthest from the master cylinder (usually the right front if you have dual fronts), then the left front, then the rear.
Common mistake: Pumping the lever wildly. This aerates the fluid in the master cylinder, making the problem worse. The correct stroke is slow and deliberate: pull lever, open bleed valve, close valve, release lever. Repeat until the stream from the hose is bubble-free.
This is a maintenance skill that pays for itself. A shop will charge for the hour. You can do it in twenty minutes with patience. If you’re tackling this, you’re likely the same owner who sees the value in cleaning an ATV air filter regularly to protect the engine.
Frequently Asked Questions
Can I use any DOT 4 fluid in my ATV?
Yes, but with a caveat. The manual says “Honda DOT 4 Brake Fluid, or any brake fluid of equal quality and performance.” Major brands like Motul, Castrol, or Brembo DOT 4 meet this standard. Avoid no-name auto parts store generics. The quality of the corrosion inhibitors varies widely.
How do I know if my brake disc is worn out?
You measure it. The Landmaster ATV service manual gives the hard numbers. A front disc has a standard thickness of 3.810-4.166mm (0.150-0.164″). The service limit is 3.556mm (0.140″). Use a micrometer. If it’s at or below the limit, replace it. Also check for deep scoring or grooves you can catch a fingernail on.
Why does my ATV brake squeal?
New pads often squeal lightly during the first few miles as they bed in. Persistent, loud squealing usually means vibration. The pad shims or anti-rattle clips are missing, damaged, or need a dab of disc brake quiet paste on the backing plate. Glazed pads from overheating can also squeal.
Is it safe to pressure wash my ATV brakes?
No. Direct high-pressure water can force past dust boots and contaminants into the caliper piston seal and ABS sensors. It can also instantly warp a hot brake disc. Use a low-pressure hose or a brush and bucket to clean the wheels and calipers.
How long do ATV brake pads last?
It’s entirely usage-dependent. Mud and sand are abrasive and can halve pad life. Gentle trail riding might yield 100-150 hours. Aggressive dune riding might kill a set in 30. Inspect them every 25 hours; your eyes will give you a better answer than any mileage estimate. This variability is similar to ATV tire lifespan, which is also dictated by terrain and riding style.
The Bottom Line
ATV brake maintenance isn’t about heroic repairs. It’s about boring, regular inspections. Look at the fluid. Look at the pads. Feel the lever. That trio catches ninety percent of problems before they leave you stranded.
The one spec to memorize is your model’s recommended fluid—DOT 3 or DOT 4. The one rule to never break is using fresh fluid from a sealed bottle. Everything else—the pad changes, the system bleed, the disc measurements—is just following the manual with clean tools. Keep the system sealed, clean, and within wear limits, and your brakes will be the last thing you ever have to worry about. That leaves you free to focus on choosing the right ATV accessories for your next adventure.
