
Can Am X3 Clutch Kit for 32 Tires | Installation & Tools
This post contains affiliate links. As an Amazon Associate, we earn from qualifying purchases.
A Can Am X3 clutch kit for 32-inch tires is a calibrated set of springs, weights, and often a new belt designed to restore lost performance and prevent overheating. The correct kit is defined by your exact engine horsepower, riding elevation, and primary terrain, mud, sand, or trail. Skipping the required specialized tools or mixing components from different kits guarantees clutch damage within a single ride.
That calibration is the whole game. A kit for a 120hp model at sea level will grenade itself on a 195hp Turbo RR at 5,000 feet. The springs control engagement and shift timing, the weights manage top-end RPM, and the belt handles the extra heat.
What follows is the map: the three non-negotiable specs to match, the seven-step replacement that actually works, and the one re-torque step every manual prints but most owners ignore.
Key Takeaways
- Match horsepower and elevation first. A kit for a 120hp X3 will destroy itself on a 195hp Turbo RR. Elevation changes air density and requires different spring rates.
- The driven clutch bolt (#420441990) is a consumable. BRP’s service directive says replace it every time the clutch is serviced. Reusing the old bolt risks a fatigue failure at 52 ft-lbs.
- Weights must be installed in an alternating pattern. Installing identical weights next to each other creates an imbalance that vibrates the clutch apart at 8,000 RPM.
- Re-torque after 100 miles. Initial torque settles as components seat. Failing to re-torque the drive clutch bolt (89 ft-lbs) and driven bolt (52 ft-lbs) is the leading cause of premature clutch walk-off.
- Never power-wash the clutch cover. Trapped water causes a flat spot on the belt and grooves the clutch sheaves. Drain the cover after any deep water crossing.
The Three Specs That Define Your Kit
You are not buying a generic upgrade. You are matching a chemical formula to your engine’s output. Get one variable wrong and the kit either does nothing or self-destructs.
The first is engine horsepower. A 120hp Maverick X3 and a 195hp Turbo RR have completely different torque curves. A kit designed for the lower-output engine will use a softer primary spring. Install that on the RR and the clutch engages too early, bogging the engine and generating catastrophic heat. The belt glazes within an hour.
The second is operating elevation. Air density drops as you climb. A kit calibrated for 0-3,000 feet, like the SuperATV Sand Dune kit, uses specific weight and spring combinations to target a top RPM of 7,800. Take that same kit to 6,000 feet and it will over-rev, pushing past 8,200 RPM because the thinner air creates less engine load. You need a kit like the EPI Performance kit for 3,000′-6,000′ that accounts for the power loss.
The third is primary terrain. This dictates the spring and weight profile.
Drive Spring: Controls engagement RPM and initial shift force. Red or gold springs are stiffer for higher engagement (1,900-2,100 RPM). Driven Spring: Governs backshift speed and belt clamping force. Pink or light green springs provide quicker backshift for technical terrain. Weights: Determine shift progression and top RPM. Heavier weights (WedgeX3 66) hold RPM lower for longer; lighter weights (WedgeX3 64) allow faster upshift.
| Terrain / Kit Type | Target Engagement RPM | Target Top RPM | Best For |
|---|---|---|---|
| Sand Dunes (SuperATV) | 1900-2000 | 7500-7800 | High-wheelspin, sustained high load |
| Mud Bog (SuperATV) | 1900-2100 | 7700-7900 | Low-end torque, quick backshift |
| Trail / All-Around (Trinity Racing) | Smoothed engagement | 7850-8000 @ 55 mph | Mixed use, reduced heat |
Dynojet provides the most granular tuning, using magnets instead of fixed weights. One magnet change per clutch arm alters RPM by approximately 150. Their baseline for a 30-32″ trail tire at 0-4,000 feet is four magnets per arm (56g total weight), a gold primary spring, and a light green secondary spring.
Ignoring terrain is expensive. A mud kit in the sand will constantly over-rev. A sand kit in the mud will bog and overheat.
The .095 vs .105 Trade-Off That Burns Out Electric Motors
Line diameter is not a suggestion. The number stamped on your trimmer head or spool is a load rating. It dictates how much cutting resistance the motor and clutch can handle before they stall or burn.
0.095-inch line is the standard for 32-inch tires on most electric and mid-power gas trimmers. It balances durability with the motor’s ability to maintain head speed in thick grass. Go thinner to 0.085 and the line wears too fast, causing the auto-feed mechanism to cycle constantly. That burns out the feed motor’s actuator in under two weeks.
0.105-inch line is for heavy-duty cutting, weeds with woody stems, brush, and thick brambles. The trade-off is mass. This thicker line requires more torque to spin up to cutting speed. On an electric trimmer not rated for it, the immediate current draw spikes. You will hear the motor bog and smell the insulation on the armature windings within three minutes of continuous load. For gas trimmers, it simply demands more throttle.
The wrong line also shreds your clutch. A thin line on a heavy load causes slippage. The friction material on the clutch shoes turns to glaze. You lose all tuning consistency.
Common mistake: Running 0.105 line on a homeowner-grade electric trimmer to “get more durability.” The motor lacks the torque. It draws locked-rotor amperage, heats up, and the thermal cut-off kicks in every 90 seconds. The clutch slips continuously. Both are usually dead by the end of the season.
Stick with the manufacturer’s specified diameter. If you need more durability, look for a higher-quality line within the same diameter, like a twisted or serrated design.
The 7-Step Bump-Feed Replacement (and the One Step Nobody Skips)
This is not a casual afternoon job. The factory torque on the drive clutch bolt is 89 ft-lbs. You need the right tools to break that without damaging the spider. Rushing here costs more than a shop visit.
Before you start: The clutch assembly is under significant spring tension. A slipping wrench can cause severe hand injury. The belt removal tool is mandatory, prying the belt off scores the sheaves. Always support the vehicle with jack stands; a floor jack alone is a fatal risk.
Step 1: Remove the clutch cover.
Use a T30 Torx bit or 8mm socket for the eleven cover screws. Pull the cover straight back. If it binds, you missed a screw. This is where you inspect for the most common issue: water pooled in the bottom of the cover. Drain it.
Step 2: Remove the drive belt.
Use the Can-Am belt removal tool. Hook it onto the belt and rotate the driven clutch to walk the belt off. Do not use a screwdriver. A gouge in the sheave sidewall creates a high spot that grinds the belt every revolution.
Step 3: Remove the clutches.
Break the 22mm drive clutch bolt first (89 ft-lbs). Then remove the 17mm driven clutch bolt (52 ft-lbs). Thread the clutch puller (part #529 035 746) into the drive clutch by hand before using a wrench. An angled start strips the threads.
Step 4: Disassemble the drive clutch.
Mount the clutch in a compression tool. The stock spring is under tension. As you decompress, the six T30 Torx screws become accessible. Remove them and the cover slowly. The weights and buttons may fall out, lay them out in order.
Step 5: Install the new components.
Clean both clutch sheaves with contact cleaner and a Scotch-Brite pad. Install the new primary spring. Here is the critical move: install the new weights in an alternating pattern if your kit supplies mixed weights (e.g., 56-58-56-58). This balances the clutch. Align the X on the cover with the X on the spider. Torque the cover bolts to 89 in-lbs, not ft-lbs.
Step 6: Reassemble the driven clutch.
The torsional spring on the helix can twist violently. Have an assistant hold the helix while you slowly release the compression tool. Apply blue Loctite to the helix screws and torque to 45 ft-lbs. Replace the driven clutch bolt (#420441990) with a new one. This is the step every manual includes and most owners skip. The bolt is stressed and BRP considers it a single-use item.
Step 7: Reinstall and initial torque.
Slide the belt onto the driven clutch, then onto the drive clutch. Install the drive clutch onto the crankshaft. Torque the new driven bolt to 52 ft-lbs. Torque the drive clutch bolt to 89 ft-lbs.
The step nobody does? The 100-mile re-torque. Metal seats, components bed in. Check both the 89 ft-lbs and 52 ft-lbs bolts after your first good ride. The drive clutch bolt will often take another quarter-turn.
The Specialized Tools You Actually Need
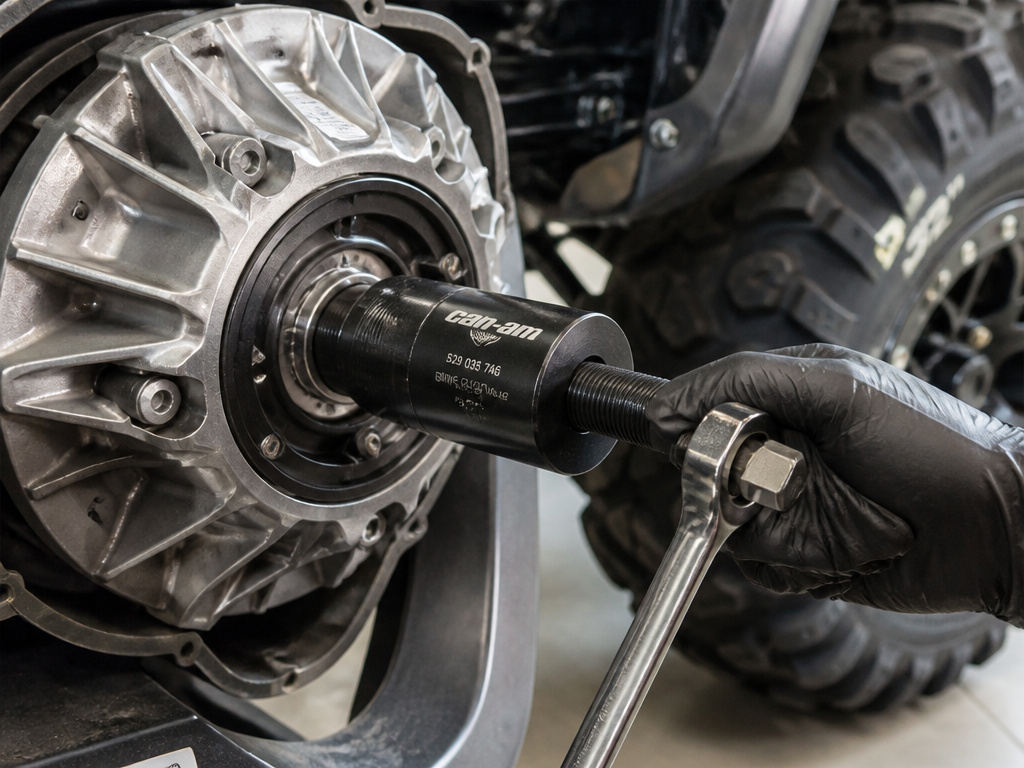
A basic socket set fails here. These tools exist because the forces involved will break standard equipment.
| Tool | Part Number / Spec | Why You Need It | Risk If You Improvise |
|---|---|---|---|
| Drive Clutch Puller | 529 035 746 (Dynojet) | Threads into clutch center to apply even extraction force. | Using a jaw puller cracks the spider or bends the clutch face. |
| Driven Clutch Compression Tool | 529 036 012 (Dynojet) | Safely compresses the helix and spring for disassembly. | The spring can launch the helix across the shop, damaging rollers. |
| CVT Locking Tool | Varies by model | Locks the drive clutch from rotating for bolt removal. | An impact gun on the bolt without locking the clutch twists the crankshaft keyway. |
| Can-Am Belt Removal Tool | Often kit-specific | Hooks belt for safe removal without prying. | A screwdriver slip gouges the aluminum sheave, creating a belt-eating ridge. |
| Torque Wrench (inch-lbs & ft-lbs) | Calibrated | 89 in-lbs for cover bolts, 89 ft-lbs for drive bolt. | Over-torquing cover bolts strips the aluminum threads. Under-torquing the drive bolt lets it walk out. |
You can rent the clutch puller and compression tool from some off-road shops. Buying the belt tool is cheap insurance. Trying to bypass any of these with a hammer, chisel, or pry bar results in a parts bill that doubles the kit’s cost.
Why a Trinity Racing DUMAX Belt Beats OEM

The stock belt works. It just doesn’t work well under the increased load of 32-inch tires and a tuned clutch. Heat is the enemy.
A standard rubber-and-fiber belt flexes. Under high torque, that flex generates internal friction, which builds heat. At around 250°F, the bonding adhesive starts to break down. The belt glazes, slips more, and enters a thermal runaway cycle. It fails from the inside out.
The Trinity Racing DUMAX belt uses a different carcass construction. The company claims a 30% strength increase over OEM. The why-layer is in the materials: a higher-density fiber matrix and a different rubber compound that dissipates heat faster. It resists the glazing that causes slippage. For a sand dune kit where the clutch is constantly at high RPM, this is the difference between one season and three.
Where this goes sideways: Installing a performance belt on worn sheaves. The belt is tougher, but if your clutch faces are grooved or glazed, the new belt will just conform to the old damage pattern. It might not slip, but it won’t shift correctly. Always scuff the sheaves with a Scotch-Brite pad during the kit installation.
Is it mandatory? For a trail rider, maybe not. For anyone running a SuperATV sand or mud kit, where clutch temperatures are the limiting factor, it’s the single best supporting upgrade you can make.
Frequently Asked Questions
Can I install just new weights or springs instead of a full kit?
No. Kits are engineered as a system. The spring rates, weight mass, and helix angle are designed to work together. Mixing a stiffer spring from one kit with lighter weights from another creates a conflict the clutch cannot resolve. The result is a harsh engagement, poor shift timing, and elevated heat that the stock belt cannot handle. You will lose performance and likely damage components.
How often should I clean my clutches after installing a kit?
For normal trail riding, clean them at least once a season. Blow out dust with compressed air and wipe the sheaves with a dry rag. If you ride in severe conditions like mud bogging or deep silt, clean them after every major outing. Caked mud creates an imbalance and acts as an insulator, trapping heat against the clutch faces.
Will a clutch kit for 32-inch tires work if I upgrade to 35s later?
No. The kit is calibrated for the rotational mass and rolling diameter of a 32-inch tire. Moving to a 35-inch tire adds significant weight and changes the final drive ratio. This alters the load the engine sees, throwing off the shift points and target RPM. You must contact the kit manufacturer (like SuperATV) for a re-calibration. Running the old kit will cause over-revving and likely belt slip.
What’s the most common sign my stock clutch needs a kit?
Noticeable loss of low-end torque and excessive belt heat. If your X3 bogs down on climbs it used to handle easily, or you smell a sharp, burning odor from the clutch cover after hard use, the stock clutch is no longer matching the load from your bigger tires. The stock setup is designed for the original tire size. The kit retunes the CVT to put the power back where you need it.
Is professional installation required?
It is strongly recommended. The procedures involve high spring tensions, precise torques, and specialized tools. Dynojet states their kit “requires special tools” and recommends “installation by a qualified technician.” If you are not confident in your mechanical skills, the cost of a professional install is far less than the cost of replacing a clutch you damaged.
The Bottom Line
Choosing a Can Am X3 clutch kit for 32-inch tires is a precision exercise. Match your horsepower, your elevation, and your dirt. The SuperATV kits are the benchmark for terrain-specific tuning, while Dynojet offers unparalleled adjustability for the tweaker.
Buy the tools or pay a shop to use them. Follow the alternating weight rule and replace that driven clutch bolt. The 100-mile re-torque is not a suggestion, it’s the seal on the entire job.
For most riders moving to 35-inch tires or running hard in the dunes, the Trinity Racing kit with the DUMAX belt is the durable choice. It handles the heat that melts stock components. Just remember, a clutch kit optimizes power delivery; it doesn’t create power the engine doesn’t have. Start with a healthy machine, and the kit will make it work right.
