
How to Fix a Flat Tire on a Bicycle: Essential Gear & Tools
This post contains affiliate links. As an Amazon Associate, we earn from qualifying purchases.
To fix a flat tire on a bicycle, you remove the wheel, find the puncture, patch or replace the inner tube, and reassemble. The critical step most people skip is the forensic inspection of the tire and rim to find the cause, or you’ll be fixing the same flat twice within a week.
That inspection separates a permanent fix from a roadside bandage. Every piece of embedded glass or spoke burr left inside the rim will punch a new hole in your new tube on the very next ride.
What follows is the difference between patching a symptom and solving a problem. We’ll walk through the exact 10-step process for a standard tubed flat, the three common valve types you’ll encounter, and the entirely different procedure for a tubeless setup. You’ll also learn which parts of a flat are actually fixable and which mean the tube is trash.
Key Takeaways
- The tube is rarely the real problem. Find and remove the embedded debris in the tire or the sharp edge on the rim first.
- Presta valves require you to unscrew the tip before deflating; Schrader valves need a tool to depress the internal pin.
- A pre-glued patch from a repair kit is a trailside emergency fix. A proper vulcanizing patch, applied with cement, is the only permanent repair.
- For tubeless tires, sealant needs to be checked and replaced approximately every three months, or it dries into useless clumps.
- Pinch flats happen from low pressure. Holes on the inside edge of the tube point to a rim issue like a failed rim strip.
The 10-Step Process for a Tubed Flat (And Why Order Matters)
The goal isn’t just to get air back in the tire. It’s to ensure the air stays in. That means finding the cause of the first flat before you install the second tube.
- Shift and Remove the Wheel. For a rear flat, shift the chain onto the smallest rear cog to create slack. Open the quick-release lever or undo the thru-axle. For a front wheel, this is straightforward.
- Deflate Completely. For a Schrader valve (the car-type valve), you’ll need a small key or the tip of your pump to press the internal pin. For a Presta valve, unscrew the tiny brass nut at the tip, then press down to release air. Get all the air out. Residual pressure makes the tire impossible to remove.
- Unseat One Bead with Tire Levers. Push one side of the tire bead into the center of the rim to create slack. Insert a tire lever like the Park Tool TL-1.2 under the bead, hook it to a spoke, then slide a second lever alongside to pop a section of the bead over the rim edge. Work your way around the wheel until one entire side of the tire is off the rim.
- Pull Out the Tube. Start opposite the valve stem and gently pull the tube out from under the tire.
- Find the Puncture. Inflate the tube until it’s about twice its normal width. Listen for a hiss or feel for air on your cheek. Submerge sections in water if needed. Mark the hole with a pen.
- Inspect the Tire. This is the step that matters. Run your fingers carefully along the inside of the tire casing. Feel for the sharp object that caused the flat. Inspect the outside tread visually. Remove any debris.
- Inspect the Rim. Check the rim strip, the tape or strip covering the spoke holes. It must be intact and centered. A protruding spoke end or a torn rim strip will puncture the new tube exactly where the last one failed.
- Patch or Replace the Tube. For a small puncture, a quality patch kit with vulcanizing cement creates a permanent bond. Clean and roughen the area around the hole, apply a thin layer of cement, let it dry until tacky, then press on the patch. A pre-glued patch is a get-home fix.
- Reinstall the Tube. Inflate the new or patched tube just enough to give it shape. Insert the valve into the rim hole first, then tuck the rest of the tube inside the tire, ensuring it’s not twisted.
- Reseat the Tire and Inflate. Using your thumbs, work the tire bead back onto the rim. The last section will be tight; avoid using levers if possible, as they can pinch the tube. Inflate to the recommended tire pressure, checking that the bead seats evenly all around.
Skip the tire inspection and you’ll repeat the entire job within ten miles. The thorn or piece of glass is still in there, waiting for the fresh tube.
The Valve You Have Changes the Game
Not all air valves are the same. Using the wrong pump head or missing a simple step will leave you stranded.
Schrader Valves are the standard on cars, many mountain bikes, and cruisers. The stem is about 8mm (5/16″) in diameter and has a spring-loaded pin inside. To deflate, you must poke something into the valve to depress that pin. A CO2 inflator or a floor pump head does this automatically when you attach it.
Presta Valves are thinner, nominally 6mm (1/4″) in diameter, and are common on road and performance bikes. They have a threaded tip you must unscrew before air can flow in or out. Tighten it after inflation to seal.
| Valve Type | Key Identifier | Critical Step Before Deflating | Common Pump Compatibility |
|---|---|---|---|
| Schrader | Wider stem, rubber base, looks like a car tire valve. | Depress the internal pin with a tool. | Standard floor pump, most portable pumps, gas station air chucks. |
| Presta | Thin stem, threaded tip with a small locknut. | Unscrew the tip locknut completely. | Presta-specific pump head, or use an adapter for Schrader pumps. |
| Woods/Dunlop | Rare outside certain regions; looks like a Presta with a wider base. | Usually has a removable valve core; deflation may require depressing a pin. | Often requires a specific adapter; check before you ride. |
Where this goes sideways: Forcing a Presta valve into a pump head designed for Schrader. You’ll bend the delicate stem and cause a slow leak at the valve base that no patch can fix.
The valve core itself can be a source of leaks. A specialized valve core tool like the Park Tool VC-1 can tighten a loose core. If the stem is cracked or cut near the base, the entire tube is junk.
What Your Puncture Pattern Tells You (Diagnosis Before Repair)
Where the hole is on the tube points directly to the cause. This turns a repair into a diagnosis.
- Two Small Holes Close Together (“Snakebite”): A pinch flat. The tube was pinched between the rim and an obstacle because tire pressure was too low. The fix is higher pressure or a wider tire.
- A Slit or Gash on the Outer Side of the Tube: You hit something sharp—a nail, glass, a thorn. The offending object is almost certainly still in the tire. Find it.
- A Hole on the Inside Edge of the Tube: This points to a problem inside the rim. A spoke nipple has poked through, the rim strip has shifted, or a burr on the rim bed is rubbing. Inspect the rim strip thoroughly.
- A Cut Right at the Valve Stem: The tube wasn’t seated properly in the rim or was twisted during installation. It can also happen from riding with very low pressure, allowing the tube to shift and chafe.
TL;DR: Snakebite means more air. A gash means find the debris. An inside hole means check the rim strip. A valve cut means check your installation.
When a Patch Isn’t Enough (Tire Boots and Tube Replacement)
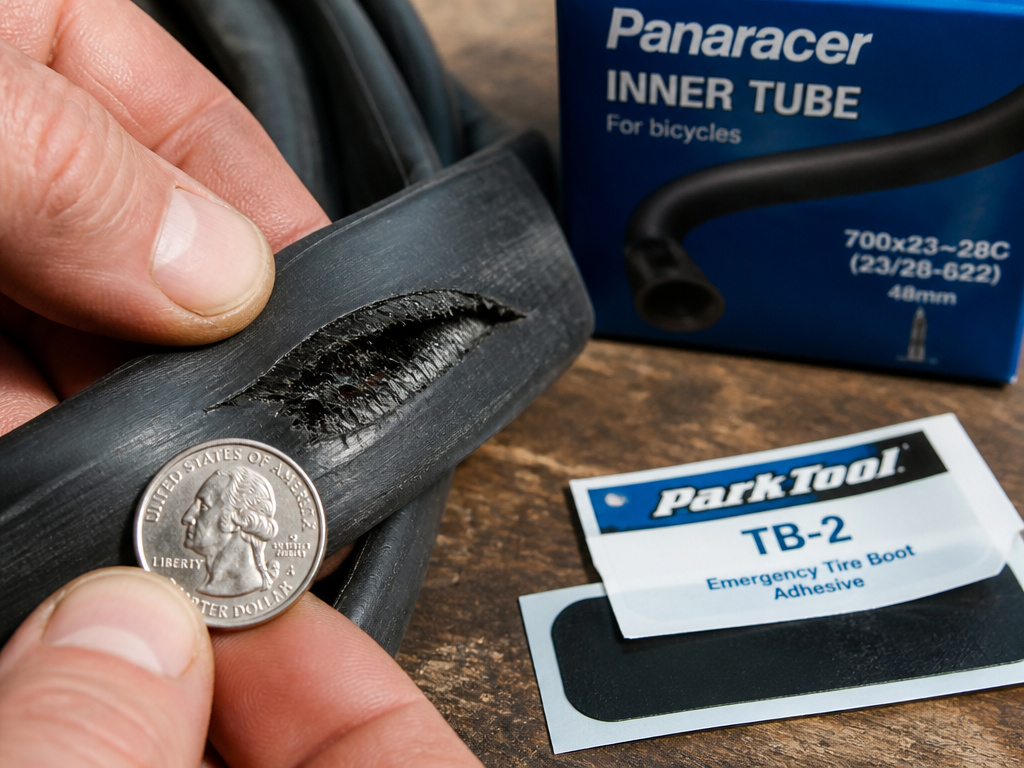
Some damage is beyond a simple patch. Knowing the limit saves you time and a second walk home.
- Large Gashes or Blowouts: A shredded hole larger than a quarter usually isn’t repairable. The tube’s structural integrity is gone. Replace it.
- Valve Stem Damage: If the stem is cracked, cut, or the rubber base is torn, the tube is done. Patches can’t handle the flex here.
- Multiple Punctures in a Small Area: The tube is compromised. A new one is safer and more reliable.
For a damaged tire casing—a cut in the tire fabric itself—a tire boot is the trailside answer. The Park Tool TB-2 is a durable adhesive strip designed for this. You place it inside the tire, covering the cut to protect the tube. It’s a temporary get-home fix, not a permanent solution.
A booted tire should be replaced as soon as possible. The boot prevents immediate failure, but the tire’s strength at that point is compromised.
Tubeless Tire Flats: A Different Animal
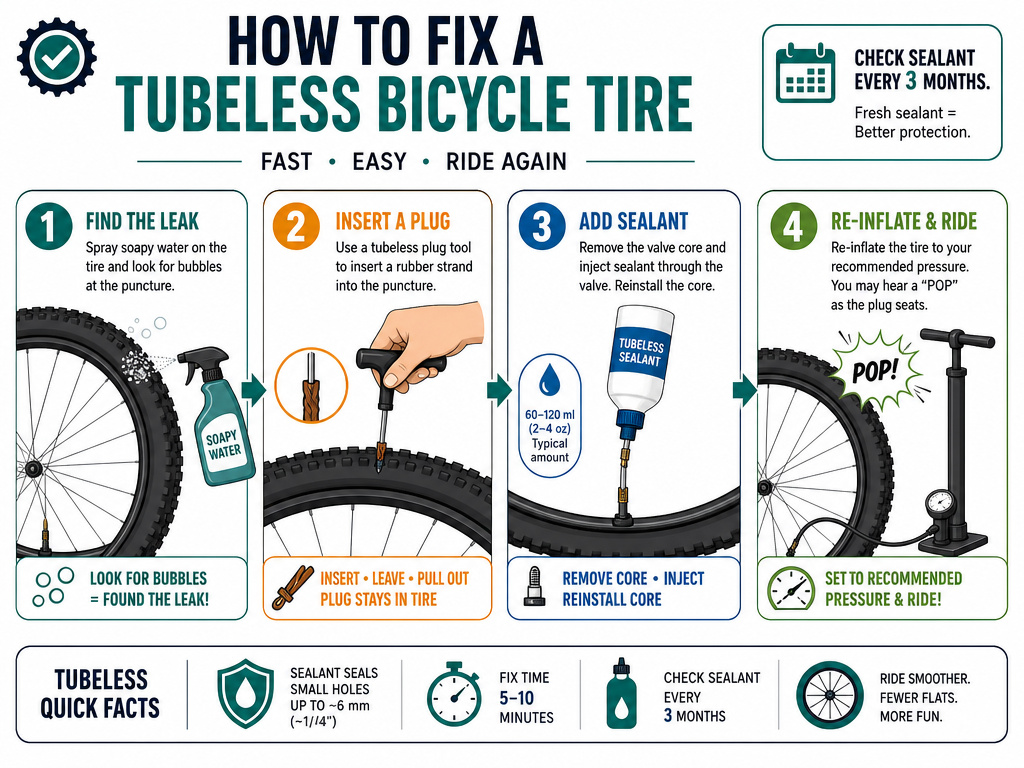
Tubeless systems use sealant inside the tire to automatically plug small punctures. Fixing a flat here is less about the tube and more about the sealant.
- Locate the Leak. Spin the wheel and look for where sealant is spraying out. For a slow leak, submerge sections in water.
- Plug It. For a small hole, a tubeless plug tool like the Park Tool TPT-1 inserts a sticky rubber strand that seals from the inside. This is the tubeless equivalent of a patch.
- Add Sealant. If the sealant is old and dried up, it won’t seal. Michelin recommends checking and replacing sealant approximately every three months, depending on riding frequency. Inject new sealant through the valve core (if removable) or by breaking the tire bead.
- Re-inflate. You often need a strong burst of air from a floor pump or a CO2 inflator to reseat the tire bead onto the rim. A distinct “pop” confirms it’s seated.
The big advantage is that sealant can seal multiple small holes as you ride. The downside is maintenance—dried sealant turns into a mess of rubber chunks inside the tire.
The Tools You Actually Need (And One You Don’t)
You can fix most flats with a very short list. Buying a dedicated kit is easier, but knowing the components lets you build a better one.
- Tire Levers (2): Plastic is mandatory. Metal levers damage rims. The Park Tool TL-1.2 or TL-6.3 are standards.
- Patch Kit: A vulcanizing kit with sandpaper, rubber cement, and patches. The Park Tool GP-2 is a pre-glued emergency option.
- Pump: A portable tire inflator for the road, and a accurate floor pump for home. For tubeless, a pump with a high-volume chamber helps reseat beads.
- Spare Tube: Carry one that matches your valve type and tire size (e.g., 700c for road bikes).
- Multitool: For adjusting brakes or loosening axle nuts if your bike doesn’t have quick-release.
The tool you don’t need? A screwdriver. Using one as a tire lever is a classic mistake. It will almost certainly pinch and ruin your new tube.
Frequently Asked Questions
Can you patch a tube with super glue?
No. Super glue dries brittle and cannot flex with the tube. It will crack and fail almost immediately. Only vulcanizing cement or pre-glued patches designed for bicycle tubes work.
How do you fix a flat without tire levers?
You can sometimes roll the tire bead off the rim using your thumbs, starting opposite the valve. This works best with flexible tires and supple rims. For tight tires, you’ll likely pinch the tube trying. Carrying levers is simpler.
Why did my brand new tube go flat immediately?
You almost certainly pinched it during installation with a tire lever, or you failed to remove the original puncture cause from the tire or rim. Re-inspect everything before installing a second new tube.
Is tubeless sealant better than a tube?
For preventing small punctures, yes. Sealant can plug holes up to a few millimeters as you ride. For larger cuts or when sealant dries out, you still need a repair kit or a spare tube as a backup. It’s a system, not a magic bullet.
How tight should the tire be on the rim?
The tire should seat snugly, but the final hold comes from air pressure pushing the bead against the rim’s hook. If you’re using extreme force to get the last section on, you risk pinching the tube. Letting the tire sit in the sun to warm up can make it more pliable.
The Bottom Line
Fixing a flat is a mechanical skill, but preventing the next one is detective work. The hole in the tube is just the evidence. The real culprit is still in the tire, on the rim, or in your tire pressure gauge.
Keep a real patch kit and a set of plastic levers in your bag. Know your valve type. And remember that a quick check of your tire pressure before a ride is the single easiest way to avoid the most common flat—the pinch flat. Everything else is just managing the inevitable.
