
Which Grips Stay Secure? Lock on vs Slide on Grips Compared
This post contains affiliate links. As an Amazon Associate, we earn from qualifying purchases.
You choose between lock-on grips, which clamp to your handlebar with bolts, and slide-on grips, which rely solely on friction fit. The lock-on system wins for high-vibration off-road and downhill use, eliminating slip and twist. The slide-on grip remains a simpler, lighter choice for casual riding where pure grip force isn’t the primary demand.
That clamp versus friction decision defines every subsequent choice about compound, pattern, and cost. If your hands are your main contact point with the trail, a slipping grip doesn’t just cost comfort, it costs control at the exact moment you need it.
What follows is the physical why behind grip twist, the specific torque numbers that actually hold, and which named models from Renthal, ODI, DMR, and DEITY are engineered to solve the problem for each riding style.
Key Takeaways
- Lock-on grips use 6061 T6 aluminum clamps tightened to 2-3 Nm; they cannot twist on the bar, making them mandatory for hard downhill or motocross riding.
- Slide-on grips depend entirely on the inner sleeve’s friction against the handlebar; soft, tacky compounds like Renthal’s Ultratacky can slip under high torque, especially when wet.
- The DMR Gridlock at 150mm length and 34mm diameter is built for large hands and high vibration; the ODI Dread Lock V2.1 uses a single-clamp system with soft TPE ends for longer comfort.
- Installing slide-on grips demands isopropyl alcohol for lubrication and a hard, final seating whack with the palm; skipping this leaves an air gap that guarantees twist.
- Grip diameter is a control spec: 30-32mm is standard; 34mm+ like the Gridlock trades precision for vibration damping and is a niche, not default, choice.
The Lock-On Design: Built to Resist Throttle Twist
A lock-on grip isn’t just a grip with a collar. It’s a two-part mechanical system where a CNC-machined aluminum clamp applies uniform radial pressure around the handlebar, independent of the rubber compound’s own grip. This separates the job of staying put from the job of feeling good.
The clamp itself is the anchor. Brands like DEITY use 6061 T6 aluminum, the same grade used for stem clamps, lasered and anodized. The bolt torque spec matters: the Brompton Lock On Grip manual calls for 1.5 Nm, while DMR specifies 2 Nm for its Gridlock collar bolts. Under-tightening lets the grip rotate; overtightening strips the threads in the soft aluminum or cracks the nylon core insert some models use. The sweet spot is firm, not heroic.
Common mistake: Overtightening lock-on clamp bolts. The aluminum threads strip before the bolt snaps, leaving you with a collar that can’t be secured. A 4mm Allen key with a short lever arm delivers the right feel, if you need a long cheater bar, you’re already past the limit.
Because the clamp does the holding, the grip body can be made from specialized, often softer compounds optimized for feel and vibration damping without worrying about slip. Renthal’s Aramid compound mixes Kevlar fibers into the resin for durability while staying tacky. ODI’s A.I.R.E. Compound is an ultra-soft foam-like material designed specifically for the ODI F-1 Series Dread Lock V2.1 grips. These materials would be a liability in a slide-on design, they’d twist under braking forces, but inside a lock-on system, they’re free to do their sole job: comfort.
The integrated collar also solves “throttle twist,” where the grip rotates under heavy palm pressure, a notorious issue on mountain bikes and dirt bikes. Once the clamp is set, that rotation is impossible. This is why every serious enduro, downhill, or e-bike grip recommendation defaults to lock-on. The control is non-negotiable.
The Slide-On Grip: Simplicity Under Pressure
Slide-on grips work through interference fit: the inner diameter of the grip is slightly smaller than the outer diameter of the handlebar. You stretch the rubber or Kraton sleeve over the bar, and it tries to return to its original size, creating constant inward pressure. The friction from this pressure is what resists twisting.
The installation is the whole game. The DEITY Lockjaw installation tip is canonical: “whack the end of the grip 3 times with the palm of your hand until the grip fully seats onto the handlebar.” That final impact collapses any tiny air pockets between the grip sleeve and the bar. An unseated grip will twist from the first hard bump.
Lubrication is essential for a proper slide-on fit. Isopropyl alcohol is the standard because it evaporates completely, leaving no residue to become a permanent lubricant. Hairspray or soapy water is a common shortcut, but it can leave a film that promotes later slipping. The alcohol lets you slide the grip on with moderate force, then evaporates, locking the grip in place as the rubber contracts.
The limitation of slide-ons is direct: the grip’s resistance to twisting is tied to the rubber’s hardness and the surface texture of the handlebar. A soft, tacky compound like Renthal’s Ultratacky provides incredible hand feel but has lower sheer strength against a smooth aluminum bar. Under high braking load or in wet conditions, that interface can fail. This makes slide-ons a better fit for casual trail riding, city bikes, or applications where extreme forces aren’t expected.
Where this goes sideways: Using a soft, tacky compound on a slide-on grip for aggressive mountain biking. The grip feels fantastic in the parking lot, but during a steep, wet descent, it can twist in your hand mid-brake. You’ll feel it shift before it fully rotates, which is your cue to stop and reassess.
Slide-on grips are also lighter, since they lack the aluminum collars and bolts. The Brompton superlight lock-on grips are 42g a pair, but a simple foam slide-on can be half that. For weight-critical builds or vintage restorations where a clamp collar would look wrong, slide-ons are the only period-correct option.
Lock-On vs. Slide-On: The Direct Decision Table
The choice between the two systems isn’t vague. It comes down to three measurable factors: vibration levels, grip force required, and installation tolerance. This table matches the system to the riding style.
| Riding Style | Best Grip System | Why It Wins | Risk If You Choose Wrong |
|---|---|---|---|
| Downhill / Enduro / E-Bike | Lock-On | Clamp prevents any twist under high braking and vibration loads. | Grip twist under heavy braking causes loss of control; happens on the first steep, rough section. |
| Trail / All-Mountain | Lock-On (Preferred) | Handles variable terrain and moisture safely. More compound options. | Slide-on may hold, but you’ll constantly check grip position, breaking focus. |
| Cross-Country / Gravel | Slide-On or Lock-On | Weight vs. Security trade-off. Lock-on adds ~60g. | Heavy lock-ons are a perceptible penalty on long climbs; slide-ons risk slip on technical descents. |
| City / Commuter / Casual | Slide-On | Lighter, simpler, cleaner look. Adequate for low-force riding. | Almost zero functional risk, provided the grip is seated correctly during installation. |
| Dirt Bike / Motocross | Lock-On | Absolutely mandatory. Throttle and brake control depend on a fixed reference point. | Slide-on will twist within one moto, leading to inconsistent throttle and dangerous brake modulation. |
The table shows the progression. As soon as the riding involves repeated high impacts, wet conditions, or your safety depends on a consistent hand position, the lock-on’s mechanical guarantee outweighs its slight weight and complexity penalty. For a deeper look at options within the lock-on category, our guide to top-rated lock-on mountain bike grips breaks down compound and pattern choices.
Grip Compounds and Patterns: The Feel Layer
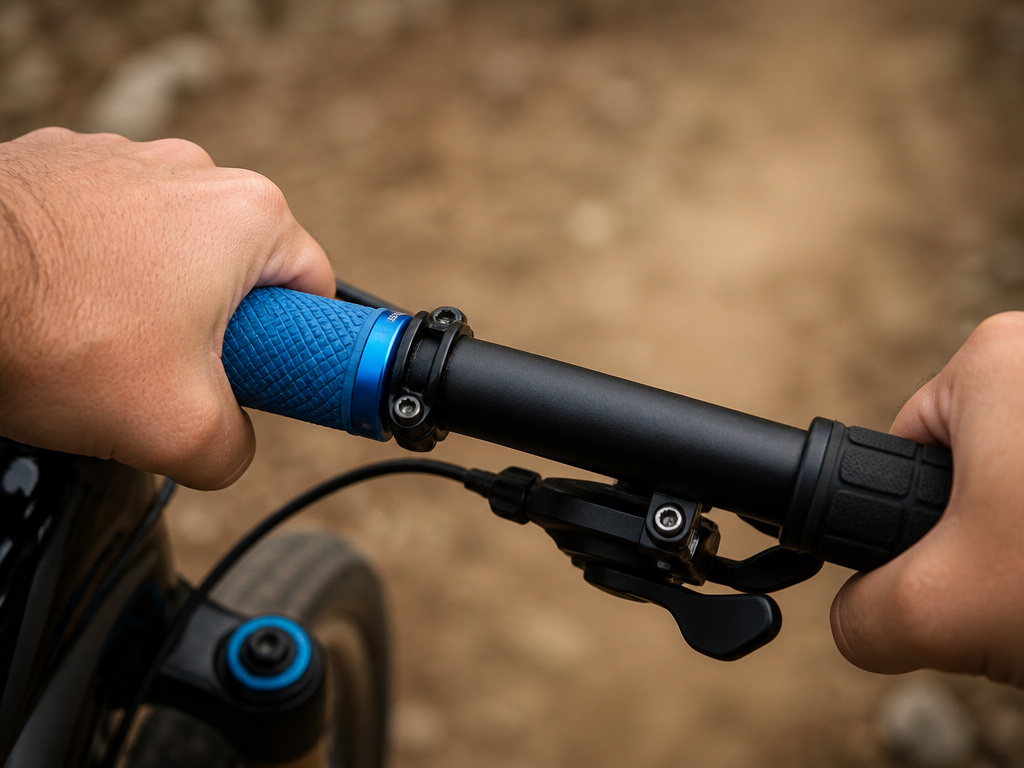
Once the attachment method is decided, the compound and surface pattern dictate comfort, control, and durability. These are not interchangeable preferences, they interact directly with the lock-on vs. Slide-on decision.
Soft, Tacky Compounds (Renthal Ultratacky, ODI A.I.R.E.):
These materials deform around your hand and glove, increasing surface contact and reducing pressure points. They are fantastic for vibration damping. However, tackiness increases friction against your glove, which can lead to hot spots on very long rides. In a lock-on system, they’re superb. In a slide-on system, their lower sheer strength is a real liability, as noted in the DMR Gridlock Grip product story where they shifted to a lock-on design for their larger, softer grip.
Firmer, Durable Compounds (Kraton rubber, standard rubber):
These offer more feedback from the bar and are more resistant to tearing and wear from brake levers and crashes. They work in both systems, but in slide-ons, a firmer compound is often necessary to provide enough torsional rigidity to resist twisting. The trade-off is more transmitted vibration and less comfort over kilometers.
Surface Patterns:
- Diamond / Waffle (DEITY Lockjaw, DMR Gridlock): Provides consistent grip in all directions, especially when muddy or wet. The raised pattern bites into your glove.
- Smooth / Rounded: Lower friction against bare hands, preferred for long-distance comfort where you frequently adjust hand position. Can be slick when wet.
- Finger Contours (ODI Dread Lock): Molded depressions aim to distribute pressure across the palm. They only work if your hand size matches the mold; if not, they create pressure points.
The DEITY Lockjaw employs a “recessed half waffle” pattern next to a “deep dish diamond” pattern, aiming to give multiple textures in one grip. It’s a design built for the variable demands of enduro racing, where you need security on descents and comfort on climbs. This level of specialized design is almost exclusively found on lock-on grips, as the R&D assumes a stable, non-rotating platform. For other specialized disciplines, our resource on best dirt bike grips details compounds built for full-throttle vibration.
Sizing and Fit: Diameter and Length Are Not Guidelines

Grip diameter is measured at the outer edge, typically ranging from 30mm to 34mm. Your hand size should dictate this choice, but most riders never measure. * 30-32mm (Standard): Fits most adult hands. Provides a balance of control and low hand fatigue. * 34mm+ (Oversize, e.g., DMR Gridlock): For larger hands or riders seeking maximum vibration damping. The larger air cavity within the rubber absorbs more trail buzz. The trade-off is a slight loss of precision, as finger wrap-around is reduced.
Grip length must match your handlebar real estate. You need enough bare bar for your brake levers, shifters, bar ends, and possibly a GPS mount. The DMR Gridlock requires 150mm of free bar space per side. A common mistake is buying longer grips without checking bar space, resulting in levers being forced into an awkward, inward position that compromises control.
For lock-on grips, also note the collar placement. Some have a flanged end to protect your hand; others are low-profile. This affects where your hand sits relative to the brake lever clamp. Test the position before final tightening.
Installation tip from the DEITY manual: If a slide-on grip fit is too tight, use a small amount of isopropyl alcohol for lubrication. For lock-ons, apply a drop of low-strength thread locker (blue Loctite) to the clamp bolts during final assembly to prevent them from vibrating loose over a season of riding.
These specs aren’t marketing. A grip that’s too large for your hand forces your fingers to work harder to hold on, accelerating forearm pump. A grip that’s too short leaves a pressure ridge at the edge of your palm. The right bicycle grips combine diameter, length, and compound to disappear in your hands, letting you focus on the trail.
The Installation Process: Where Most Riders Create Future Problems
A perfect grip fails if installed incorrectly. The steps differ by system, and skipping the nuance guarantees a callback.
Lock-On Grip Installation (5-Step Sequence):
- Clean the handlebar with isopropyl alcohol. Remove all old glue, tape, and oil.
- Slide the grip onto the bar without the clamp bolts seated. Position it exactly where you want it, accounting for brake lever placement.
- Seat the aluminum collar fully against the grip body. Look for a uniform gap around the entire collar.
- Tighten the clamp bolts to the manufacturer’s torque spec in a cross pattern, just like a car wheel. For DMR, this is 2 Nm. For Brompton, 1.5 Nm.
- Do a final twist test with full hand force. Any movement means re-clean, re-seat, and re-torque. Do not just tighten the bolts more, you’ll strip them.
Slide-On Grip Installation (The Critical Seating Step):
- Clean the bar thoroughly, as above.
- Pour a small pool of isopropyl alcohol into the open end of the grip. Swirl it to coat the inner sleeve.
- Quickly slide the grip onto the bar, twisting slightly as you push. Get it to its approximate final position.
- This is the step everyone rushes: Wait 60 seconds for the alcohol to evaporate. Then, using the palm of your hand, deliver 3-4 firm, sharp whacks to the closed end of the grip. You should feel it settle. This collapses the sleeve onto the bar.
- Let it cure for an hour before riding. The rubber will continue to contract.
The consequence of a poorly seated slide-on grip reveals itself on the first hard landing or heavy brake. The grip will rotate just enough to feel wrong, and you’ll have to redo the entire process. Lock-on grips are more forgiving of placement but intolerant of dirty bars or uneven clamp seating. For a visual guide on this and other mechanical fixes, see our advice on handlebar grips installation.
Frequently Asked Questions
Can you convert a slide-on grip to a lock-on system?
No. The lock-on system requires an integrated collar molded or bonded to the grip body during manufacturing. You cannot retrofit a clamp onto a slide-on grip effectively. The two designs are fundamentally different from the factory.
Why do my new lock-on grips still feel like they’re moving?
This is almost always the clamp not being fully seated against the grip body before tightening. Loosen the bolts completely, push the grip firmly against the collar so there’s no gap, then re-torque. If the grip itself is rotating on the bar inside the clamp, the bar is contaminated or the grip’s inner sleeve is defective.
Are lock-on grips heavier than slide-on grips?
Yes, due to the aluminum collars and bolts. A typical pair of lock-ons weighs 100-140g (e.g., DEITY Lockjaw at 104g, DMR Gridlock at 140g). A pair of simple slide-on rubber grips can be 60-80g. For weight-weenie builds, this matters; for most riders, the security outweighs the penalty.
How often should I replace my grips?
Replace them when they are visibly torn, hardened, or lose their tackiness. For aggressive riders, this may be every season. For casual riders, they can last years. A hard, shiny surface indicates the rubber has hardened and will transmit more vibration, increasing hand fatigue. Regularly inspecting your MTB grips is part of routine bike maintenance.
Can I use lock-on grips on any handlebar?
Yes, as long as the handlebar diameter matches the clamp’s designed size (almost universally 22.2mm for standard mountain bike bars). Ensure you have enough space on the bar for the grip length plus your controls. The grips themselves are not left/right specific, but the clamp bolts are often positioned to face the brake lever clamp for a clean look.
The Bottom Line
Lock-on grips exist for one reason: to eliminate twist. If your riding involves braking forces, vibration, or moisture levels where a millimeter of rotation would break confidence, they are the only answer. The ODI Dread Lock V2.1 for comfort or the DMR Gridlock for large hands and big hits are where that category leads.
Slide-on grips persist because they are elegantly simple, light, and correct for applications where ultimate security isn’t the price of entry, commuting, casual trails, or vintage builds.
The real mistake is choosing a grip for its color or pattern first. Decide on the clamp. Your hands will tell you the rest.
