
Master How to Properly Load a Truck Bed for Maximum Safety
This post contains affiliate links. As an Amazon Associate, we earn from qualifying purchases.
To properly load a truck bed, you must match three things: the truck’s weight rating, the load’s center of gravity, and the tie-down’s rated capacity. Exceeding any one leads to a handling change you feel within two miles, specifically a steering wobble at highway speed followed by brake fade on the first downhill grade.
That wobble comes from the load shifting the truck’s balance point behind the rear axle. The manual lists a zone, usually between the front and rear of the wheel wells, where the combined weight should sit. Ignore that zone and the rear suspension carries more than it was engineered for.
What follows: where to find your truck’s specific numbers, how to place weight so it doesn’t kill the steering, and the gear that keeps a partial load from becoming a projectile on a hard stop.
Key Takeaways
- The payload capacity on your door sticker is the absolute ceiling for combined passenger and cargo weight. Hitting that number changes the ride height.
- Place the heaviest items forward, against the cab wall, and keep the combined center of gravity between the wheel wells over the rear axle. A load behind the axle makes the front tires light.
- Tie-down points have weight ratings too. A Chevrolet Silverado 2500 fixed tie-down holds 500 lb; an accessory point holds 250 lb. Overload one and the bed wall crumples.
- Friction is not a restraint. A single bump or hard brake overcomes it. Use ratchet straps or cargo bars for anything that can slide, tip, or bounce.
- For a partially full bed, secure loose items with a cargo net and fill the voids with soft bags or empty containers to prevent side-to-side shift.
The Three Numbers You Must Match Before Loading
Find your truck’s door jamb sticker. It has two critical figures: Gross Vehicle Weight Rating (GVWR) and payload capacity. The GVWR is the total weight limit for the truck, fuel, passengers, and cargo. The payload is the slice left for people and stuff after the truck’s own weight.
Payload is the combined weight of cargo and passengers that the vehicle is carrying. The tire label on the driver’s door states the maximum payload as “THE COMBINED WEIGHT OF OCCUPANTS AND CARGO SHOULD NEVER EXCEED XXX kg OR XXX lb.”
You calculate your remaining cargo capacity by subtracting the weight of passengers, fuel, and any aftermarket equipment from the payload number. A family trip with four adults and a full tank can eat half your payload before the first box goes in. Weigh the truck on a commercial scale if you’re near the limit.
Exceeding payload doesn’t just hurt fuel economy. It compresses the rear springs past their designed ride height. The front end lifts, reducing steering control and headlight aim. The overloaded rear tires heat up faster, and the braking distance increases because the truck’s balance has shifted rearward.
Where this goes sideways: Assuming “half a ton” means 1000 pounds of cargo no matter what. Your truck’s actual payload might be 1400 lb or 850 lb. The only way to know is to read the sticker.
| Term | What It Means | Where to Find It | What Happens If You Exceed It |
|---|---|---|---|
| Gross Vehicle Weight Rating (GVWR) | Maximum allowable total weight of the truck and everything in/on it. | Door jamb sticker. | Suspension bottoms out, tires overheat and fail, brakes fade, frame can bend. |
| Payload Capacity | Maximum weight of passengers and cargo only. | Door jamb sticker, listed as “XXX lb” after “Payload”. | Rear sags, steering goes light, braking performance drops, accelerated wear on rear components. |
| Gross Axle Weight Rating (GAWR) | Maximum weight each axle (front & rear) can carry. | Door jamb sticker. | Overloaded axle bends or breaks; tires wear unevenly and blow out. |
How Weight Placement Changes Steering Feel
The goal is to keep the combined center of gravity of your cargo over the rear axle. Picture a teeter-totter. The axle is the pivot point. Weight placed behind it lifts the front of the truck. Weight placed ahead of it pushes the front down.
A Chevrolet manual specifies the load’s center of gravity should be positioned in a zone between the front of each wheel well and the rear of each wheel. That’s your target.
Load heavy items first. Place the densest boxes, tools, or equipment against the cab wall, centered left to right. This puts the weight forward, where it’s supported by the truck’s frame rails. Stack lighter, bulkier items on top and toward the rear. Never place your heaviest item at the very tailgate, it turns the truck into a pendulum.
An unbalanced load feels specific. You’ll notice a slight wander or hesitation in the steering at around 45 mph. The front tires have lost bite because the rear weight is levering them up. On a curve, the truck will feel lazy to turn in and then want to keep turning once you straighten the wheel.
I watched a friend load a single motorcycle by himself. He wheeled it to the tailgate and tied it down. The front wheel was barely contacting the ground. The first freeway on-ramp produced a terrifying wobble. We moved the bike forward a foot, strapping it to the front tiedowns. The steering weight returned instantly.
For two-tiered loading, creating a platform over wheel wells, the Chevrolet manual calls for three or four wooden planks (5 cm by 15 cm) across the bed width. The upper load’s center of gravity still follows the same rule: keep it over that axle zone.
Tools for a Secure Load
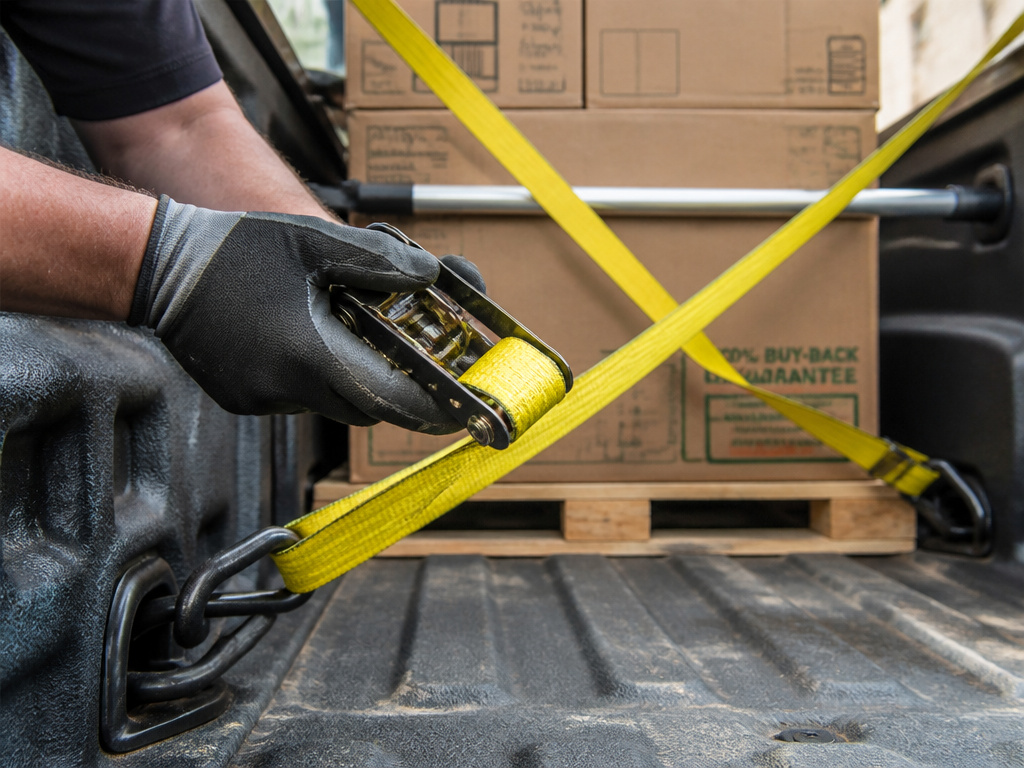
Friction alone is not a restraint. On any road surface with bumps, turns, or sudden stops, a load will slide. Your job is to prevent movement in every direction: forward, backward, side-to-side, and up.
Ratchet straps are your primary tool. They provide tension you can measure by feel. A good rule: tighten until the strap webbing is firm but not guitar-string tight. Cross them in an X-pattern over the load to prevent forward and lateral movement. Anchor them to proper tie-down points, not bed hooks or accessory rails not rated for the load.
Cargo bars are a solid wall. A cargo bar expands between the bed walls, creating a physical barrier. Use it to block items from sliding forward into the cab. It’s excellent for securing a few large boxes or a piece of furniture. Pair it with straps for a complete system.
Nets and organizers contain the chaos. A cargo net holds down a pile of soft bags or loose items. Bed organizers or storage boxes keep smaller tools and supplies from rattling around in the vast space.
The weakest link is always the attachment point. Pickups have two kinds: fixed tie-downs (often in the bed corners) and accessory points (holes in the bed rail). Their ratings differ wildly.
For a 2020 Chevrolet Silverado 2500, the 12 fixed cargo tie-downs have a maximum load per corner of 500 lb. The 9 accessory tie-downs (holes) are rated for 250 lb per tie-down. Overloading an accessory point doesn’t just break a strap; it can collapse the thin bed wall sheet metal.
The part nobody mentions: That 500 lb rating is for a corner, meaning the combined tension from multiple straps sharing that point. A single strap pulling at a sharp angle can exceed the rating with a much lighter load. Use angled D-rings or soft loops to keep pull directions as straight as possible.
| Tool | Best For | Critical Check |
|---|---|---|
| Ratchet Straps | Securing heavy, solid items (furniture, appliances, motors). | Hook integrity, webbing for cuts/frays, ratchet mechanism smoothness. |
| Cargo Bar | Blocking forward shift of large, bulky items. | End grip material, expansion lock strength, overall length vs. Your bed width. |
| Cargo Net | Containing many loose, lightweight items (bags, camping gear). | Elasticity, hook strength, mesh size (smaller for smaller items). |
| Bungee Cords | Holding a tarp or light cover in place. Never for cargo security. | Hook strength, cord elasticity (not brittle). |
Step-by-Step Loading Sequence
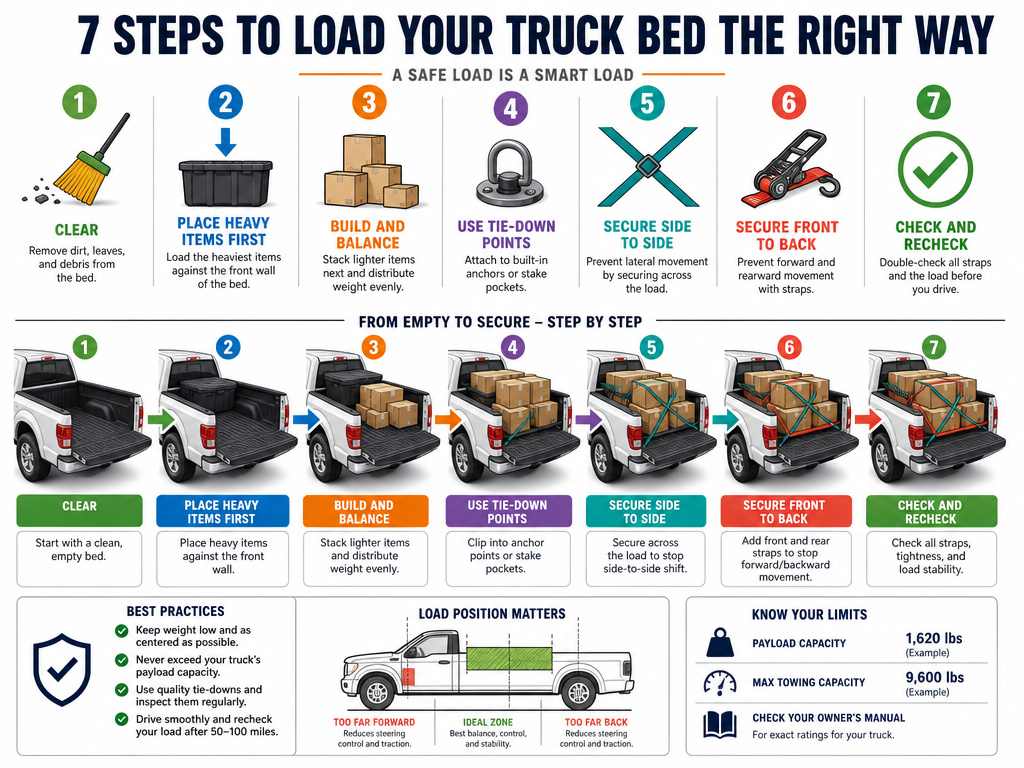
Follow this order every time. It builds a stable, secure load from the ground up.
- Clear and Inspect the Bed. Remove any debris. Check all tie-down points for damage or rust. Look at your truck bed liner, damage here can hide a weak spot in the bed floor.
- Place Heavy Items First. Load the heaviest, most dense items first. Position them forward against the cab wall, centered side-to-side. This sets your low center of gravity.
- Fill Gaps and Create a Level Layer. Use lighter boxes, bags, or empty storage containers to fill voids around your heavy items. Aim for a relatively level surface. This prevents smaller items from shifting into cavities and destabilizing the load.
- Add Secondary Layers. Stack lighter items on top. Keep the overall height as low as possible. Tall loads catch wind and dramatically increase the risk of rollover.
- Secure Front to Back. Use a cargo bar or your largest items to block forward movement. Apply at least two ratchet straps from the front tie-downs, over the load, to the rear tie-downs. Tighten until the strap webbing is snug and the load cannot be rocked by hand.
- Secure Side to Side. Cross two straps in an X-pattern over the load. This prevents lateral shifting during turns. If using a cargo net, secure it after the straps.
- Final Check and Re-Tighten. Walk around the truck. Give the load a push from different angles. Nothing should slide or shift more than a quarter-inch. Drive for 10-15 minutes, then stop and re-check all strap tensions. Materials settle.
Skip step 5 and your unblocked load becomes a battering ram in a panic stop. The physics are simple: the kinetic energy of a 200 lb box at 60 mph is enough to bend a cab wall.
Common Loading Mistakes and Their Consequences
Mistakes here aren’t just inefficient. They are dangerous and expensive.
Overloading the Rear. Putting too much weight behind the rear axle is the most common error. The symptom is a vague, wandering steering feel above 40 mph. The consequence is a loss of control during emergency maneuvers. The front tires cannot grip properly.
Under-Rating Tie-Downs. Using a cheap, thin strap on a heavy engine block. The strap snaps, the load shifts, and the truck’s balance changes mid-corner. Always match the strap’s Working Load Limit (WLL) to your cargo weight, and use multiple straps for a single heavy item.
Assuming “It’s Not Going Far.” The most dangerous loads are on short trips. Complacency sets in. You skip the side straps, you don’t cross the straps, you think friction will hold. A single hard brake proves it wrong. Distance doesn’t matter; inertia does.
Ignoring Wind Profile. A tall, flat-sided load (like a mattress or plywood) acts as a sail. It can push the truck out of its lane in a crosswind and drastically increase stopping distance. Keep loads low, or use a truck bed cover to streamline. If you must haul tall, reduce speed significantly and plan for wider turns.
Forgetting the Re-Check. Nylon straps stretch. Wooden pallets settle. Loads compress. If you don’t stop to re-tighten after the first 20 miles, the second half of your trip has a looser, noisier, and less secure load. The sound of shifting cargo is your warning.
Special Cases: Motorcycles, Furniture, and Partial Loads
Motorcycles. Use a dedicated motorcycle ramp and canyon-style wheel chocks. The bike should be upright, in gear, with the front wheel strapped forward and the rear wheel strapped rearward and sideways. The goal is to eliminate compression and rebound movement from the suspension. A poorly tied bike can bounce and snap its kickstand.
Furniture and Appliances. Protect corners with moving blankets. Use furniture straps around the entire item, not just over the top. Dressers and cabinets must be emptied; their doors can fly open. Tape drawers shut. The sheer surface area of a sofa or mattress demands multiple straps at strategic points, not just one over the middle.
Partial Loads (The Worst Scenario). A few boxes rattling around in a big bed are projectiles. They gain momentum with every turn. The fix is to pack them tightly against one wall (preferably the front) and use a cargo net or multiple straps to cinch them into a single tight bundle. Fill the empty space with lightweight, bulky items like empty coolers or duffel bags to eliminate room for movement.
Before You Go
Loading a truck bed is an exercise in physics, not just muscle. Find your payload number on the door sticker and respect it. Place weight over the rear axle, not behind it. Use straps and bars as restraints, not suggestions.
The right truck bed accessories, straps, bars, nets, organizers, turn a cargo hold into a secure system. Start with a set of robust tie-down straps and a pair of cargo bars. That combination handles ninety percent of loads safely.
Listen to the truck. A new vibration, a wandering steering wheel, or a change in braking feel is the vehicle telling you the load is wrong. Stop and fix it. The few minutes it takes are cheaper than a ticket, a repair, or a worse outcome.
Frequently Asked Questions
Can I use bungee cords to secure cargo?
Never use bungee cords as primary restraints. They are for holding tarps or light covers in place. Under dynamic load, they stretch and release energy, launching the cargo. A ratchet strap locks tension; a bungee cord stores it.
How do I find my truck’s exact payload capacity?
Open the driver’s door. Look on the door jamb (the vertical part where the latch catches) for a yellow and white sticker. It will list “Payload” or “The combined weight of occupants and cargo should never exceed XXX lb.” That is your number. Do not use generic “half-ton” or “one-ton” labels.
Is it okay to load above the bed rails?
It can be, but it introduces major risks. The center of gravity rises, increasing rollover chance. The load catches wind, affecting stability and fuel economy. It may also violate road height laws. If you must exceed the rail height, secure the load with a web of straps from multiple angles, reduce speed, and avoid highways.
What’s the best way to secure a ladder or long pipes?
Use at least three tie-down points. Secure the front end to a front tie-down. Secure the middle to both sides of the bed to prevent roll. Secure the rear overhang to the rear tie-downs. Use foam or towels at the contact points with the bed rails to prevent scratches and slippage. Flag any overhang extending more than four feet beyond the vehicle.
Why does my truck sag in the rear when loaded?
Some sag is normal as the rear suspension compresses under weight. Excessive sag, where the rear bumper is visibly lower than the front, means you are likely over the payload limit or have placed too much weight behind the axle. This condition stresses springs, shocks, and frame components. Redistribute the load forward or remove some weight.
