
Your Guide to Fixing a Flat Tire on an Electric Scooter
This post contains affiliate links. As an Amazon Associate, we earn from qualifying purchases.
To fix a flat tire on an electric scooter, you must first identify your tire type: tubeless self-healing or standard inner tube. For tubeless tires, check if the self-healing gel has sealed the puncture. If not, the tire needs replacement—do not ride it flat, as heat from the motor will melt the gel into a damaging mess. For inner tube tires, locate the puncture with soapy water, remove the wheel, replace or patch the tube, and reassemble. The entire process demands patience, especially on rear tires, which are notoriously stiff and can take an hour just to remove.
That difference between tubeless and inner tube setups changes everything about the repair. Getting it wrong means you might ride a tire that can’t be patched, or you might try to patch a system designed only for replacement. The next thirty minutes of your life depend on which system you’re looking at.
What follows is a walkthrough of both. You’ll get the identification steps, the mandatory safety warning that manuals bury, and the one repair step that even experienced mechanics call a workout. By the end, you’ll know whether to reach for a patch kit, a new tire, or the phone for a pro.
Key Takeaways
- Stop riding immediately if the tire is flat. Continuing to roll on a flat, especially a self-healing tubeless tire, melts the sealing gel against the hot motor, creating a permanent, damaging mess.
- Identify your tire type before touching a tool. Scooters like Apollo models use tubeless, self-healing tires that often cannot be patched—replacement is the only safe fix for sidewall damage or large punctures.
- The rear tire is the hardest part. Its stiff bead and integrated motor make removal and reinstallation a physical challenge that routinely takes an hour, even for pros.
- Use tire levers, not screwdrivers. A screwdriver tip will almost certainly puncture your inner tube during removal. Plastic tire levers are cheap and prevent that rookie mistake.
- Check for the object inside the tire. After a puncture, the nail or glass shard often stays lodged in the tread. If you don’t find and remove it, your new tube will flat again within minutes.
How to Identify Your Tire Type
Look at the valve stem first. A standard Schrader valve (the same type as a car tire) protruding from the rim usually means an inner tube system. If the valve stem looks different, is flush, or your scooter is a modern Apollo, Ninebot, or Segway model, you might have a tubeless setup.
Check your owner’s manual or the manufacturer’s support site. Brands like Apollo are explicit: their newer scooters use tubeless, self-healing tires. The support page for Apollo scooters states these tires are filled with a gel that seals small tread punctures automatically. A flat on these doesn’t always mean a simple tube swap.
Common mistake: Assuming all scooter flats are solved with a patch kit. On a tubeless self-healing scooter, a sidewall puncture is a replacement job, not a repair. The gel isn’t present there in sufficient quantity.
If you have an older or budget scooter like a Razor E500S or an Electra Scoot-N-Go, you almost certainly have a standard pneumatic tire with an inner tube. The manual for the Electra Scoot-N-Go lists a specific tire size (2 1/4″ x 12 1/2″) and warns that under-inflation below 45-50 PSI damages the rim and cuts battery life.
| Scooter Type | Tire System | Telltale Sign | Flat Repair Path |
|---|---|---|---|
| Modern Apollo (2023+) | Tubeless Self-Healing | Manufacturer spec; valve may be flush | Inspect for sealant plug; replace tire if sidewall/large puncture |
| Legacy Apollo (pre-2023) | Standard Inner Tube | Schrader valve | Standard tube patch or replacement |
| Razor E500S | Standard Inner Tube | Schrader valve (per manual) | Standard tube patch or replacement |
| Electra Scoot-N-Go | Standard Inner Tube | Schrader valve; specific tire size listed | Standard tube patch or replacement |
The Critical Safety Warning Everyone Skips
If you have a flat, stop riding. Right now. This isn’t a gentle suggestion.
On a standard inner tube scooter, riding on a flat pinches the tube between the rim and the road, causing irreparable “snake bite” punctures and likely bending the rim. On a tubeless self-healing scooter, the danger is more specific and catastrophic. The Apollo support guide warns that riding on a flat lets the self-healing gel contact the hot motor. The gel melts.
It oozes out, coating the tire, rim, motor, and every surrounding component in a sticky, glue-like residue. Cleaning it is a multi-hour chemical battle, and the gummed-up motor may never perform the same. That turns a $50 tire replacement into a $300+ repair bill. The manual states it plainly: never ride “just a bit more” on a flat.
Before any repair: 1. Turn the scooter off. 2. Park it on a flat, stable surface. 3. Use the kickstand. 4. If working on the rear wheel, disconnect the battery if possible to prevent accidental motor activation.
Tools & Materials You Actually Need
You can’t improvise this job. Using a butter knife as a tire lever will puncture your tube. Using a gas station air pump without a gauge will overinflate and blow the tire off the rim.
The Non-Negotiables:
- Tire Levers (x3): Plastic ones are best. They’re designed to slide between the tire bead and rim without cutting into the tube.
- Wrench Set: Usually a 10mm, 12mm, or 14mm socket or adjustable wrench to remove the axle nuts.
- Pump with Gauge: A bicycle pump that fits Schrader valves. The gauge is essential—the Electra Scoot-N-Go manual specifies 45-50 PSI.
- Bucket, Water & Dish Soap: For the bubble test to find the leak.
The Repair Materials (Pick One Path):
- Patch Kit: For small punctures in an inner tube. A good kit includes patches, rubber cement, and a scraper.
- New Inner Tube: Faster and more reliable than patching. Must match your tire size (e.g., 8.5″ x 2.0″).
- Tire Sealant (e.g., Slime): A preventive measure for inner tubes. It can seal small punctures from the inside as you ride. Our guide to tire sealant compares the top formulas.
- New Tire: The only option for tubeless tire sidewall damage or large tread punctures.
Helpful Extras:
- Valve Core Tool: Makes deflating and adding sealant much easier.
- Talcum Powder: Dusting the new tube prevents chafing.
- Work Gloves: The rim edges are sharp, and the tire bead fights back.
The 7-Step Tire Repair Process
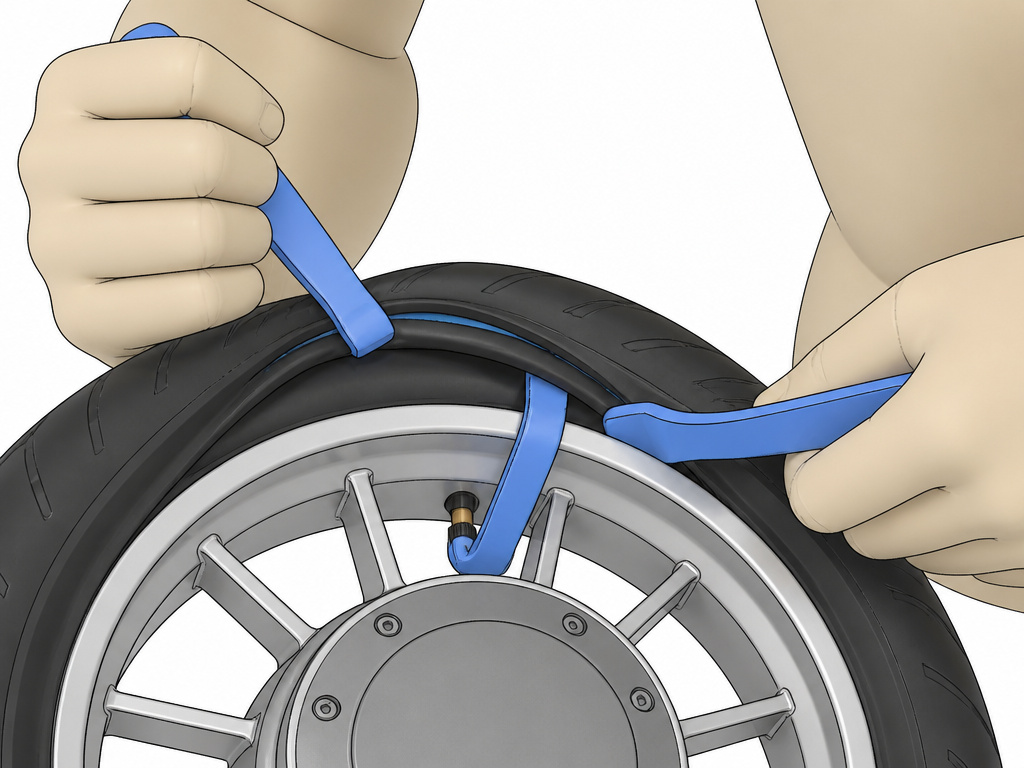
This is the core procedure for the most common setup: a pneumatic tire with an inner tube. If you’ve identified a tubeless self-healing tire with a sidewall gash, skip to replacement.
Step 1: Locate the Leak
Inflate the tire if it’s completely flat. Mix dish soap with water in a spray bottle or your bucket. Spray or wipe the soapy solution over the entire tread, sidewalls, and valve stem. Look for the telltale stream of small bubbles. That’s your puncture.
If you see an object like a nail stuck in the tread, don’t pull it out yet. It’s plugging the hole. Mark its location with chalk or tape. This soapy water trick is the same reliable method used in bicycle tire repair, and it works every time.
Step 2: Remove the Wheel
This is where you need your wrenches. Place the scooter securely on its kickstand or, better yet, elevate it on a stand. * Front Wheel: Usually straightforward. Just loosen and remove the axle nuts on both sides, and the wheel slides out. * Rear Wheel: This is harder. You have the added step of the motor cable. Before loosening the axle nuts, take a clear photo of the electrical connector. Unplug it carefully. The wheel may also have a brake disc—note how it aligns before removal.
Support the wheel as the last nut comes off. It’s heavier than you think.
Step 3: Fully Deflate the Tube
Press down on the pin inside the valve stem until you hear no more air hissing out. If you have a valve core tool, unscrew the core to deflate instantly. A completely soft tire is easier to work with.
Step 4: Remove the Tire and Inner Tube from the Rim
This is the most physically demanding step, especially on the rear tire. Its bead is incredibly stiff.
Where this goes sideways: Using a screwdriver as a tire lever. The Electra Scoot-N-Go manual explicitly warns this is likely to puncture the inner tube. Use the right tool.
- Insert one tire lever between the tire bead and the rim, opposite the valve stem. Pry a small section of the bead up and over the rim’s edge. Hook the lever onto a spoke to hold it.
- Insert a second lever about 4 inches away and pry another section up. Repeat with a third lever if needed.
- Once you have about 6-8 inches of bead lifted, you can often slide the rest of the bead off by hand. Work your way around the rim.
- With one side free, reach inside and gently pull the inner tube out. Start by pushing the valve stem back through its hole in the rim.
I won’t sugarcoat it. The first time I tried this on a GOTRAX GXL rear tire, I was sweating after twenty minutes. The bead didn’t want to budge. Warming the tire in the sun for ten minutes made the rubber more pliable and finally gave me the slack I needed. It’s a known issue, not a reflection on your skill.
Step 5: Find the Puncture and Fix the Tube
If you marked the leak location on the tire, find the corresponding spot on the tube. Inflate the tube slightly and listen for a hiss, or submerge it in your soapy water bucket to see bubbles.
- For a Patch: Roughen the area around the hole with the sandpaper from your patch kit. Apply a thin layer of rubber cement, let it get tacky, then firmly press the patch on. Hold for 30 seconds.
- For Replacement: Simply discard the old tube. Before installing the new one, run your fingers along the inside of the tire tread. You are feeling for the nail, thorn, or glass shard that caused the flat. If you don’t remove it, history repeats itself instantly.
Step 6: Reinstall the Tube and Tire
Dust the new or patched tube with a little talcum powder to help it slide. Tuck it fully inside the tire. Starting at the valve stem, push the stem through the rim hole and work the tube into place so it’s not twisted.
Now, work the tire bead back onto the rim. Use your hands to press it on, starting opposite the valve and working around. The last few inches are always the toughest. Use tire levers as a last resort and be hyper-careful not to pinch the tube. A portable inflator with a high-flow setting can help seat a stubborn bead later.
Step 7: Inflate and Reattach the Wheel
Inflate the tire slowly to the manufacturer’s recommended PSI. You might hear pops as the bead seats correctly. Check that the bead is sitting evenly all around the rim.
Reinstall the wheel onto the scooter. For the rear wheel, reconnect the motor cable using your photo as a guide. Tighten the axle nuts evenly. Spin the wheel to ensure it doesn’t rub on the brake or frame.
Take a short, cautious test ride. Listen for rubbing or strange vibrations. Check the tire pressure again after the ride.
When to Replace, Not Repair
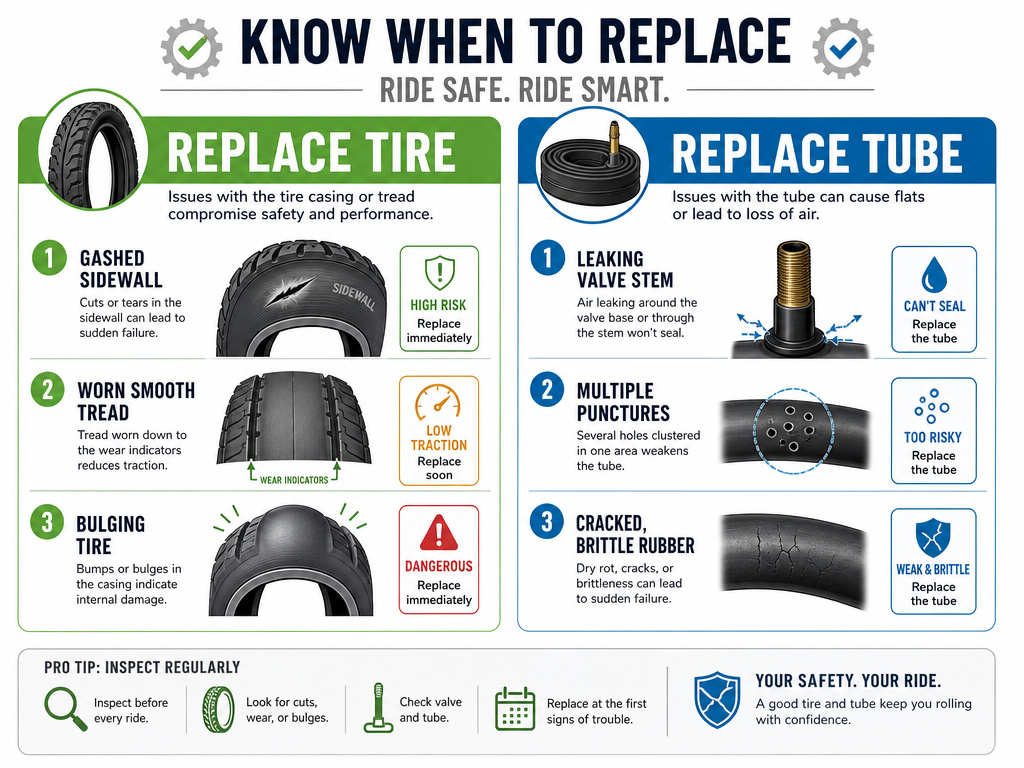
Some damage is beyond a patch. Knowing when to stop trying to fix it saves time and prevents a blowout.
Replace the entire tire if:
- There is any cut, gash, or puncture in the sidewall. The sidewall flexes with every rotation; a patch won’t hold.
- The tread is worn smooth. Bald tires puncture more easily.
- You have a tubeless self-healing tire with a large tread puncture or sidewall damage. Apollo’s official stance is that replacement is the “typical resolution.”
- The tire shows a bulge or bubble. This means the internal cords are broken, and a blowout is imminent.
Replace the tube if:
- The puncture is at the valve stem.
- There are multiple holes close together.
- The rubber is dry, cracked, or brittle with age.
For a reliable, permanent fix, a high-quality permanent sealant injected into a new tube can offer great protection against future small punctures.
How to Handle Tubeless Self-Healing Tires (Like Apollo)
The process is different. The gel inside is meant to seal small tread punctures automatically. If your tire is soft, first try inflating it to the correct PSI. The air pressure might push the gel into the hole and seal it.
If it stays inflated, you’re lucky. Monitor the pressure over the next 24 hours. If it continues to lose air, the puncture is too big for the gel. Do not use a standard patch kit. Some riders use an external tubeless plug as a temporary get-home fix, but Apollo recommends replacement for safety.
The Apollo support guide adds a critical edge case: if the leak is at the bead (where tire meets rim) or the valve, a hand pump often can’t reseat it. You need a high-volume air source like a compressor. This is why keeping a capable emergency kit in your car or garage is wise.
Preventing Your Next Flat
You can’t dodge every nail, but you can stack the odds in your favor.
- Maintain Pressure: Check PSI weekly. Under-inflated tires pinch-flat more easily and wear out faster. The Electra manual directly links low pressure to rim damage and poor battery life.
- Inspect Tires: Before a ride, do a quick visual lap. Look for embedded debris or cuts.
- Use Sealant Proactively: Adding a sealant like Slime to a new inner tube seals future punctures up to 1/4 inch as you ride. It’s a cheap insurance policy.
- Avoid Debris Fields: Steer around glass, gravel piles, and construction zones when you can.
- Store Indoors: UV rays and temperature swings degrade rubber. Keeping the scooter in a garage extends tire life considerably.
Frequently Asked Questions
Can I use a car tire repair kit on my scooter?
No. Car kits use large plugs and chemical sealants meant for high-volume tires. They can unbalance a small scooter wheel and the sealant may not cure properly in the tight space. Use a scooter or bicycle-specific tire plug kit designed for smaller punctures.
My tire keeps going flat but I can’t find a hole. Why?
You likely have a slow leak. The culprit is often a faulty valve core. Spray soapy water on the valve stem itself. If it bubbles, tighten the core with a valve tool or replace it. If not, the tube might have a micro-puncture or be porous from age—time for a new tube.
Are solid tires better than pneumatic?
They never go flat, so they’re maintenance-free. The trade-off is a brutally harsh ride and less traction, especially on wet surfaces. You sacrifice all cushioning. For city commutes on perfect pavement, they’re an option. For anyone else, the comfort of pneumatic tires is worth the occasional repair.
Is it worth patching a tube, or should I just replace it?
For a single, small puncture, a properly applied patch can last the life of the tube. For multiple holes, a tear, or valve damage, replacement is faster and more reliable. A new tube costs about the same as a quality repair kit and saves you the patching time.
How tight should the axle nuts be?
Tight enough that the wheel has no side-to-side play, but not so tight that the wheel doesn’t spin freely. A good rule is to tighten the nuts firmly with a wrench, then give a final quarter-turn. Always check that the wheel spins smoothly without rubbing the brake pads or frame.
The Bottom Line
Fixing a flat scooter tire is a rite of passage. It teaches you the mechanics of your ride and saves you a tow. The job hinges on one decision you make before picking up a tool: identifying whether you have a standard inner tube or a modern tubeless system.
For inner tubes, arm yourself with tire levers, a patch kit, and patience for the stiff bead fight. For tubeless self-healing tires, know that replacement is often the only answer, and riding flat damages more than the tire. Keep your pressure up, your eyes on the road, and a reliable puncture sealant in the tube. Then, just roll.
