
The Correct Way to Clean and Lube a Bike Chain | Step-by-Step
This post contains affiliate links. As an Amazon Associate, we earn from qualifying purchases.
Clean your bike chain by first checking for wear, then using a dedicated cleaner or neutral detergent with a brush or chain-scrubber device while the chain is on the bike, rinsing thoroughly, drying completely, and applying a drop of lubricant to each roller. Never reuse a quick-link and avoid alkaline or acidic solvents, which can cause sudden chain failure.
That single paragraph is what every basic guide will tell you. It’s not wrong. It’s also not the whole story.
The manuals from Campagnolo and SRAM, the companies that engineer these $50-$100 chains, carry warnings written in all-caps for a reason. They specify cleaning agents and forbid practices most of us consider normal. Skip those warnings and you’re not just risking a dirty chain. You’re gambling on a component that, under load, can snap and drop you onto the asphalt.
This walkthrough covers the standard process, but it pivots on the manufacturer fine print. You’ll see the tools, the step-by-step, and the why behind each move. More importantly, you’ll see where common advice directly contradicts the engineering specs, and how to decide which side of that line you stand on.
Key Takeaways
- Never reuse a quick-link. Campagnolo and SRAM state reusing a C-Link or PowerLock can cause sudden chain failure. A new link costs a few dollars; a crash costs more.
- Match your cleaner to your chain. Campagnolo explicitly warns against degreasers, recommending only neutral detergent. SRAM bans alkaline or acidic solvents. Using the wrong chemical makes the metal brittle.
- Check wear first. If your chain measures 0.8% elongation (SRAM) or exceeds 132.60 mm in length (Campagnolo), cleaning is a waste of time. Replace it immediately to save your cassette and chainrings.
- Lube penetrates, grease sits. Spray lubes coat the outside and attract grit. A drop of oil on each roller wicks inside the pin, which is where the moving parts actually live.
- The debate is real. Campagnolo’s manual says “Do not remove the chain to clean and/or lubricate it.” Many professional mechanics do exactly that. Your choice hinges on your confidence in reinstalling a fresh quick-link perfectly every time.
The Manufacturers’ Rulebook: A Warning You Can’t Ignore
Before you touch a rag or a bottle, read the safety warnings. They aren’t legal boilerplate. For Campagnolo and SRAM, they are specific, numbered, and tied to catastrophic failure modes.
Before you start: A chain under pedaling load can experience forces exceeding 1,000 pounds. A brittle link from chemical contamination or a poorly seated quick-link fails under that load, not while you’re idly spinning the cranks in your stand. The resulting crash can happen at speed, on a descent, or in traffic. Gloves and eye protection are not just for cleanliness; a snapped chain is a metal projectile.
The most critical rule is the one about quick-links. Campagnolo’s technical manual for its 11/12-speed chain is absolute: “If you open the chain by removing the C-Link™… you must use a new C-Link™ to close the chain. The C-Link™ is damaged during disassembly: it is therefore mandatory ALWAYS to use a new C-Link™… Failure to follow these instructions may cause the chain to fail, even suddenly, with consequent accidents, physical injury or death.”
SRAM’s manual is equally firm, stating its PowerLock is for one-time use only. Reusing it “may result in a broken chain that could result in a crash.”
This means the common practice of popping the chain off for a deep clean carries a hidden tax: the cost of a new connecting link every single time. Skip that tax, and you’ve introduced the single greatest point of failure on your drivetrain.
The second major warning concerns cleaning chemicals. Campagnolo advises using only “neutral detergent (avoiding the use of degreasers)” and explicitly warns against “alkaline or acid based solvents, such as rust preventive products, as they could break the chain.” SRAM echoes this, forbidding alkaline or acidic solvents and adding, “Do not soak or store the chain or cassette in a bath of any cleaning product. They will become brittle and can break under load.”
This directly contradicts the recommendation from a brand like Park Tool, which markets its CB-4 Bio ChainBrite as a specific “degreaser” for this job. The takeaway isn’t that Park Tool is wrong. It’s that you must know what’s in your bottle. Many general-purpose degreasers are alkaline. A true neutral detergent is harder to find and often marketed as a “bike wash” or “citrus cleaner” with a pH near 7.
| Manufacturer | Quick-Link Rule | Cleaning Agent | Chain Removal for Cleaning? |
|---|---|---|---|
| Campagnolo | New C-Link mandatory after every opening | Neutral detergent only; degreasers forbidden | “Do not remove the chain to clean and/or lubricate it.” |
| SRAM | New PowerLock mandatory after every opening | Biodegradable cleaners only; alkaline/acidic solvents forbidden | Not explicitly forbidden, but soaking in bath is prohibited. |
| Park Tool | Recommends using a new quick-link | Recommends specific degreasers (e.g., CB-4) | Method outlines cleaning on bike; removal is an option for thorough work. |
Gearing Up: The Non-Negotiable Tools
You can clean a chain with an old toothbrush and some dish soap. The result will be a superficially clean chain that still has grit packed inside the rollers, where it grinds away at the pins. To do it right, you need a few specific tools for chain maintenance.
A proper bike repair stand is the first essential. It holds the bike steady, keeps the chain horizontal, and lets you backpedal freely. Working on the ground or leaning the bike against a wall is a messy, frustrating compromise.
Next, you need a way to measure. The Park Tool CC-3.2 Chain Checker is the standard. It tells you if the chain has stretched beyond the 0.75% or 0.8% wear mark. Checking first saves you an hour of scrubbing a component that’s already dead and is now actively shredding your expensive cassette.
For the clean itself, you have two paths: the on-bike scrubber or the off-bake bath. The on-bike choice is a device like the Park Tool CM-5.3 or CM-25 chain scrubber. It clamps onto the chain, holds solvent, and has internal brushes that scrub all four sides as you pedal backwards. It’s quick, contained, and follows the “don’t remove the chain” guidance for brands like Campagnolo.
The off-bike method requires a specialized chain tool to break the chain, a container, and a robust cleaner. This is where you must have a new quick-link ready. This method allows for ultrasonic cleaning or a vigorous shake in a jar, which can dislodge the most stubborn, cemented grit.
Your cleaning agent depends on the warning label you choose to heed. If following Campagnolo to the letter, you need a genuine neutral-pH bike wash. If using a dedicated chain degreaser like Park Tool CB-4, you’re accepting a slight risk the manufacturer has flagged. Most dedicated bike degreasers are formulated to be mild, but the onus is on you to check.
Finally, the lube. Wet lube for rain and mud, dry lube for dust and fair weather. The bottle must have a precision tip. A spray can is useless here, it coats the outside, misses the rollers, and contaminates your brake rotors. You need a bottle that lets you place a single drop.
Where this goes sideways: Using a general-purpose degreaser like Simple Green Full Strength (which is alkaline) on a Campagnolo or SRAM chain. The metal doesn’t crack that day. It weakens over several cleanings, and the failure happens months later on a hard sprint, when you’ve forgotten what cleaner you used.
Step-by-Step: The On-Bike Deep Clean
This is the method that keeps the chain on the bike, satisfying the strictest manual warnings. It’s the safest place for a beginner to start.
Step 1: Check for wear. Insert the Park Tool CC-3.2 into the chain. If it drops in past the 0.75% mark, your chain is toast. For Campagnolo, measure 10 links with a caliper. If they exceed 132.60 mm, stop. Order a new chain instead of cleaning this one.
Step 2: Prep the workspace. Put the bike in the stand. Shift to the smallest chainring and smallest rear cog. This slackens the chain. Lay down cardboard or a tarp. Degreaser stains concrete and asphalt.
Step 3: Apply cleaner to the drivetrain. Using a brush or rag, apply your chosen cleaner (neutral detergent or approved degreaser) to the chain, cassette, and chainring. Let it sit for a few minutes to break down the grime. Don’t let it dry.
Step 4: Scrub with the chain cleaner. Fill the Park Tool CM-5.3 chain scrubber with solvent to the fill line. Attach it to the lower run of the chain. Pedal backwards steadily for at least 30 full crank revolutions. The solvent will turn black. Pour this dirty solvent out into a separate container, let the grit settle, and you can often reuse it.
Step 5: Rinse thoroughly. Refill the chain scrubber with clean, soapy water. Pedal backwards another 20-30 revolutions to rinse all cleaner residue from inside the chain links. Residual cleaner will wash away the fresh lube you’re about to add.
Step 6: Dry completely. This is the step everyone rushes. Water left inside the rollers will displace lubricant and promote rust. Use an old towel to wipe the chain down, then let it air-dry for 10-15 minutes. A blast from an air compressor is ideal.
The Lube Decision: Oil, Wax, and the Physics of Friction
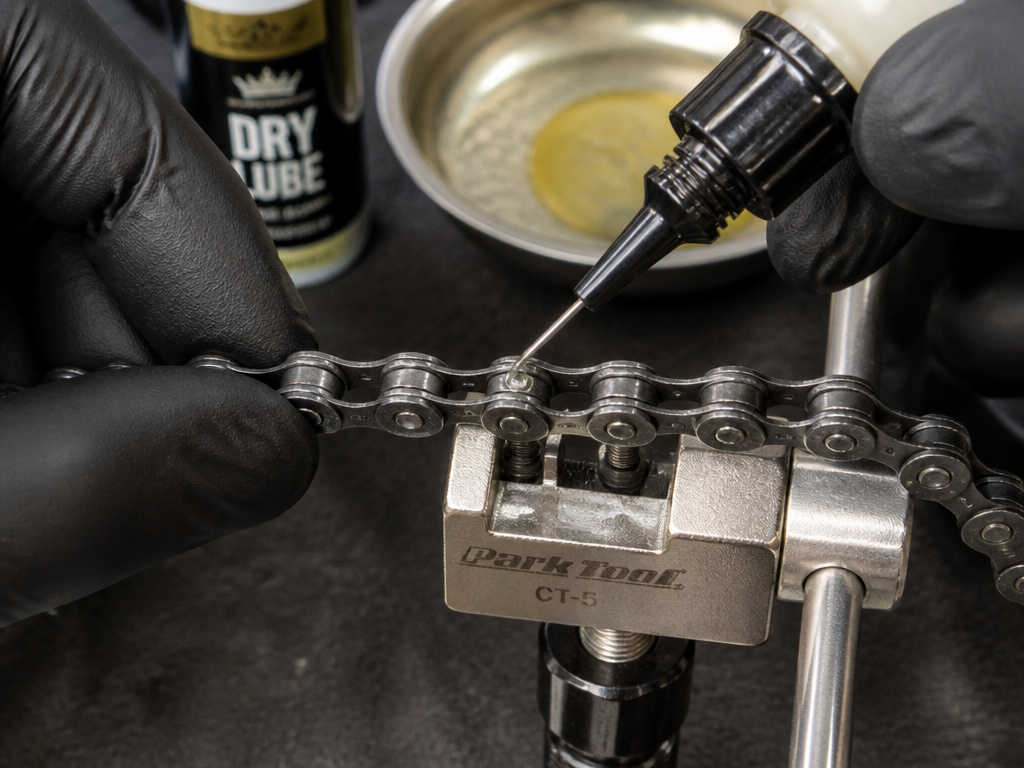
A dry chain is a dying chain. Friction between the inner roller and the pin generates heat and wears both parts. Lubricant’s only job is to get between those two metal surfaces and stay there.
Chain oil is the default. Wet lube (often a synthetic oil) is tenacious and water-resistant, perfect for wet or muddy conditions. Dry lube (usually a wax-based liquid) leaves a dry, waxy film that doesn’t attract dust. The application is the same: one drop on each roller, from the inside of the chain as you slowly pedal forward.
I prefer dry lube for my road bike nine months of the year. Not because it’s faster, but because the dry film doesn’t turn into grinding paste on our dusty summer roads. The chain stays visibly clean for weeks. The trade-off is zero water resistance; one rain shower and you’re relubing.
Chain wax is the high-commitment option. It involves a full, deep clean to bare metal, then immersion in a hot wax bath. The result is an incredibly clean, low-friction drivetrain that attracts almost no dirt. The downside is longevity; you must rewax every 150-200 miles. It’s a fantastic system for dry climates and obsessive owners. For a deep dive on the method, our guide to using wax on your bike chain covers the specifics.
The physics are simple: grit is harder than steel. If your lube is sticky (like a wet lube in dry conditions), it holds that grit against the chain, creating a lapping compound that accelerates wear. The cleanest chain is the one with just enough lube inside the pins and none on the outside plates.
| Lubricant Type | Best For | Application Frequency | Key Advantage |
|---|---|---|---|
| Wet Lube | Rain, mud, winter roads, mountain biking | Every 100-200 miles, or after wet rides | Excellent water displacement and longevity in wet conditions. |
| Dry Lube | Dry, dusty conditions, road riding | Every 150-250 miles, or when chain looks dry | Doesn’t attract dust; keeps drivetrain visibly cleaner. |
| Immersion Wax | Dry climates, performance focus, low maintenance tolerance | Every 150-200 miles | Creates the cleanest possible drivetrain with very low friction. |
After applying lube, whether oil or wax, you must wipe off the excess. Pedal the bike through a few gears, then take a clean rag and pinch the chain. Backpedal to run the entire chain through the rag. This removes the external lube that does no good and only collects dirt.
The Off-Bike Clean Debate and When to Replace
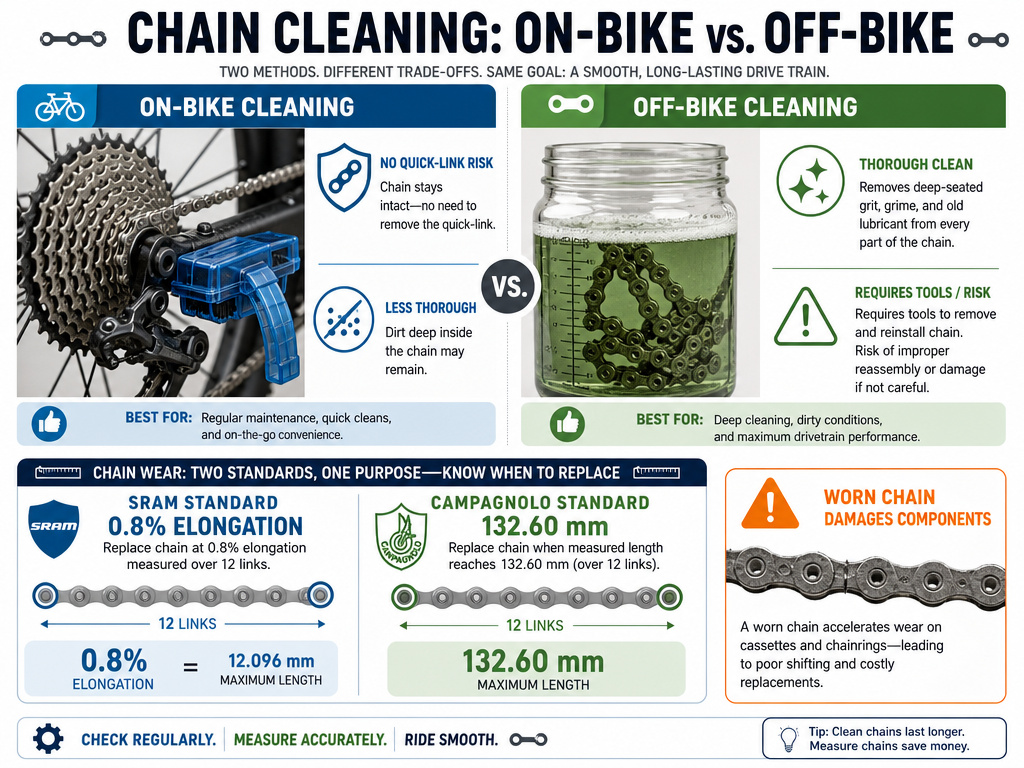
Removing the chain is the most thorough cleaning method. It’s also the one Campagnolo explicitly forbids and SRAM heavily discourages. The reason is the quick-link.
The argument for removal is power. You can shake the chain in a jar of solvent, use an ultrasonic cleaner, or inspect every link. You get all the old, contaminated lube out. The argument against is risk. You are 100% reliant on that new quick-link being installed perfectly. You also need a chain tool to break the old one and a second tool (like SRAM’s PowerLock Pliers) to seat the new one correctly.
If you go this route, the process is strict: 1. Break the old chain with a chain tool, pushing a pin out. 2. Soak and agitate the chain in your chosen cleaner. Never use a solvent Campagnolo or SRAM warns against. 3. Rinse the chain thoroughly in clean water. 4. Dry it completely, an oven on its lowest warm setting (not hot) can help, or use compressed air. 5. Install the new quick-link per the manufacturer’s instructions, using the proper tool to snap it into place. Never reuse the old one.
Whether you clean on or off the bike, know when to stop. A chain is a consumable part. The SRAM manual states replacement at 0.8% elongation. The Campagnolo manual states replacement if the chain length exceeds 132.60 mm at any point. A worn chain no longer meshes correctly with your cassette and chainrings. It will skip under load and rapidly wear those far more expensive components.
Cleaning a worn chain is like polishing a bullet you’ve already fired. Check first. If it’s shot, install a replacement chain and enjoy the crisp, silent shift of a fresh drivetrain.
Frequently Asked Questions
Can I use dish soap to clean my bike chain?
You can, but it’s a subpar choice. Dish soap is a detergent, but it’s designed to cut grease on plates, not the polymerized grease and metal grit on a chain. It often leaves a film that’s difficult to rinse off completely, which can impede fresh lubricant. For a better result, use a product from our list of recommended bike chain cleaners formulated for the job.
How often should I clean and lube my chain?
Frequency depends on conditions. For fair-weather road riding, a clean and lube every 200-300 miles is sufficient. For mountain biking, wet commutes, or dusty gravel rides, do it after every significant ride. The best indicator is the chain itself. If it looks dirty, feels gritty, or sounds noisy, it’s time.
Is a chain cleaning machine worth it?
Dedicated chain scrubber like the Park Tool CM-5.3 is absolutely worth it if you maintain more than one bike or ride in dirty conditions regularly. It standardizes the process, contains the mess, and does a more consistent job than a hand brush. It pays for itself in saved time and extended drivetrain life. For a full suite of options, see our review of chain cleaning products.
Why does my chain get dirty again so quickly after cleaning?
This is almost always caused by overlubrication. If you spray lube on the chain or don’t wipe off the excess after oiling, the sticky exterior acts like a magnet for dust and road grit. The dirt then mixes with the lube, forming an abrasive paste. The fix is simple: apply lube sparingly to the rollers only, then thoroughly wipe the entire chain clean with a rag until no black residue comes off.
What’s the difference between a “quick-link” and a “master link”?
They are the same thing. “Quick-link” is a more modern term for the single-use connecting links used by SRAM (PowerLock) and Campagnolo (C-Link). “Master link” is an older term often associated with reusable links found on some lower-speed or single-speed chains. For modern 10-, 11-, 12-, and 13-speed drivetrains, always treat the connecting link as a one-time-use part.
Before You Go
Cleaning and lubing a chain isn’t about achieving showroom shine. It’s a mechanical necessity. A clean, properly lubricated chain can save you 10 watts of effort on a ride and add thousands of miles to your cassette and chainrings.
The real trick isn’t in the scrubbing. It’s in heeding the stark warnings buried in the manufacturer PDFs. That means a new quick-link every time, a careful eye on your cleaning chemicals, and knowing when a chain is too far gone to save. Your local bike shop has a drawer full of chains they pulled from bikes after a sudden break. Every one of them tells a story of a skipped step, a reused link, the wrong solvent, ignored wear.
For most riders, the on-bike method with a dedicated scrubber and a quality dry lube is the sweet spot. It’s fast, it’s safe, and it keeps the drivetrain running quietly. Keep a basic bicycle tools kit handy with a chain checker and the right lube, and this ten-minute task becomes the most valuable regular maintenance you do.
