
Are 1 Inch Wheel Spacers Safe? The Essential Safety Guide
This post contains affiliate links. As an Amazon Associate, we earn from qualifying purchases.
One-inch wheel spacers are safe only if they meet two non-negotiable conditions: they are hub-centric, providing a precise fit over the vehicle hub, and the installation maintains the original thread engagement length of at least one full stud diameter. Fail either condition and you are gambling on a catastrophic wheel loss, an event both the NHTSA and Australian RMS explicitly warn against.
The NHTSA’s rule states a stud must thread into a nut a length at least equal to the stud’s diameter. For a common 1/2-inch stud, that means the nut must clamp onto a half-inch of perfect threads. Adding a one-inch spacer pushes the wheel one inch farther out from the hub. Unless you also add one inch of extra stud length, you cannot meet that rule. The spacer itself can be beautifully machined, but if the threads can’t grip, it’s a matter of when, not if.
Everything after this point is about how to satisfy those two conditions on your specific vehicle. The process is a mechanical checklist built on government and racing standards that tell you exactly what can break and how fast.
Key Takeaways
- A 1-inch hub-centric bolt-on spacer is the only acceptable type for street use. Slip-on spacers are a gamble because they reduce critical thread engagement.
- The NHTSA safety rule is absolute: thread engagement must be at least equal to the stud’s diameter. For a 1-inch spacer, you will almost always need extended wheel studs.
- Wheel spacers accelerate wheel bearing wear, it’s physics, not a myth. The leverage increases, and failure typically appears as a humming or grinding noise within 15,000-20,000 miles on a daily-driven vehicle.
- Quality is defined by material (forged 6061-T6 aluminum or magnetic steel per SFI spec 44.1), precision machining, and a hub bore matched to your vehicle to within thousandths of an inch.
- A one-inch spacer adds roughly 25mm of track width per side. The New South Wales RMS caps total track increase at 25mm for passenger cars and 50mm for off-road trucks. Your local regulations are likely similar.
The Legal and Safety Baseline: What the Authorities Say
Before you look at brands or prices, you need to know the hard lines drawn by the people who investigate accidents. These are the documented failure modes that get people hurt.
The National Highway Traffic Safety Administration (NHTSA) has a single page that covers wheel safety, and it is blunt. It states that spacers “do not resolve fitment problems” and that their use “could result in an unsafe condition.” The agency then lists the exact mechanical failure: a loss of torque leading to wheel separation.
“Every stud or bolt must be long enough to thread a length at least equal to the stud or bolt diameter. For example, a 1/2” thread diameter must thread into the lug nut at least 1/2”. Less than one stud thread diameter engagement is unsafe and will cause loss of torque.”
That is the central, non-negotiable rule you must design around. It is the physical minimum for the clamping force that keeps your wheel attached.
Australian regulations, specifically the NSW RMS guidelines, are just as clear. They state that “wheel spacers or adaptors must not be used for wheel conversions… Unless fitted as original equipment by the vehicle manufacturer.” This is the official stance. The guideline also provides the engineering limits that, if you do proceed, you must not exceed: a maximum track width increase of 25mm for passenger cars and 50mm for off-road 4WDs. A one-inch spacer is 25.4mm, it pushes a street car right to the legal limit immediately.
| Regulatory Body | Key Stance on Spacers | Critical Specific Rule |
|---|---|---|
| NHTSA (U.S.) | Warns against use; says they create unsafe conditions. | Thread engagement must be ≥ stud diameter (e.g., 1/2″ stud needs 1/2″ engaged thread). |
| NSW RMS (Australia) | Prohibits unless OEM-fitted. | Max track increase: 25mm (passenger cars), 50mm (off-road/trucks). |
| SFI Foundation | Certifies for racing use only (Spec 44.1). | Mandates magnetic steel, defines dimensions, sets 5-year service life. |
The takeaway is that no official body will ever endorse aftermarket spacers for street use. Your job is to install them in a way that respects the mechanical principles these agencies are trying to protect.
The Two Types of 1-Inch Spacers: One Solves the Problem, One Is It
When you buy a one-inch spacer, you are choosing between two fundamentally different designs. One solves the thread-engagement problem. The other guarantees you will fail it.
Hub-Centric Bolt-On Spacers
These are thick discs that bolt to your hub using your factory lug nuts or bolts. They have their own set of integrated, extended studs mounted perpendicularly. You bolt the spacer on, then bolt your wheel onto the spacer’s studs. The spacer has a precision-machined center bore that matches your vehicle’s hub diameter exactly, and a lip on the outer face that centers the wheel.
This design preserves, and often improves, the original thread engagement. The wheel bolts onto fresh, full-length studs. Brands like BONOSS, Eibach, and Spidertrax build spacers this way. This is the only type you should consider for a one-inch application.
Slip-On Spacers
These are simple plates, usually 1/4-inch or thinner, that slide over your existing studs. There are no integrated studs. You mount the spacer, then the wheel, then crank down your factory lug nuts.
For a one-inch slip-on, you have just moved the wheel mounting surface one inch away from the hub. Your factory studs are now one inch too short. You might get four or five turns of the lug nut onto the threads. The NHTSA requires eight to ten full turns for common M12x1.5 studs. You are now operating at half the safe threshold.
Where this goes sideways: Using a 1-inch slip-on spacer on stock studs. The lug nut bottoms out on the stud before it can clamp the wheel. The assembly feels tight, but the clamping force is on the stud tip, not the wheel. The first hard pothole shocks the load and the nuts spin off. The timeline is unpredictable, but under 1,000 miles on a bad road.
The rule is simple: any spacer over 5mm (about 3/16-inch) must be a hub-centric bolt-on type with its own studs. A one-inch spacer is five times that thickness.
Extended Studs: The Non-Negotiable Even With Bolt-On Spacers
You might think a bolt-on spacer solves everything. It does for the wheel side, but you must now look at the vehicle side.
Your factory wheel studs are a specific length. When you bolt a one-inch spacer to the hub, you are adding an inch of material between the hub face and the back of the spacer. Many factory studs are not long enough to protrude through a one-inch thick block of aluminum and still give you the required thread engagement for the lug nuts that hold the spacer on.
This is the most overlooked step in the process. You must verify that your factory studs protrude through the spacer by at least the stud’s diameter. If they don’t, you need to replace them with extended wheel studs before you even install the spacer.
The process is straightforward but requires a press, a hammer, and some patience. You knock out the old studs from behind the hub and press in the new, longer ones. ARP is the go-to brand for high-strength extended studs. Do not skip this because the spacer “seems to fit.” The clamp holding the spacer to your car is as important as the clamp holding your wheel to the spacer.
The Real Cost: Accelerated Wheel Bearing Wear
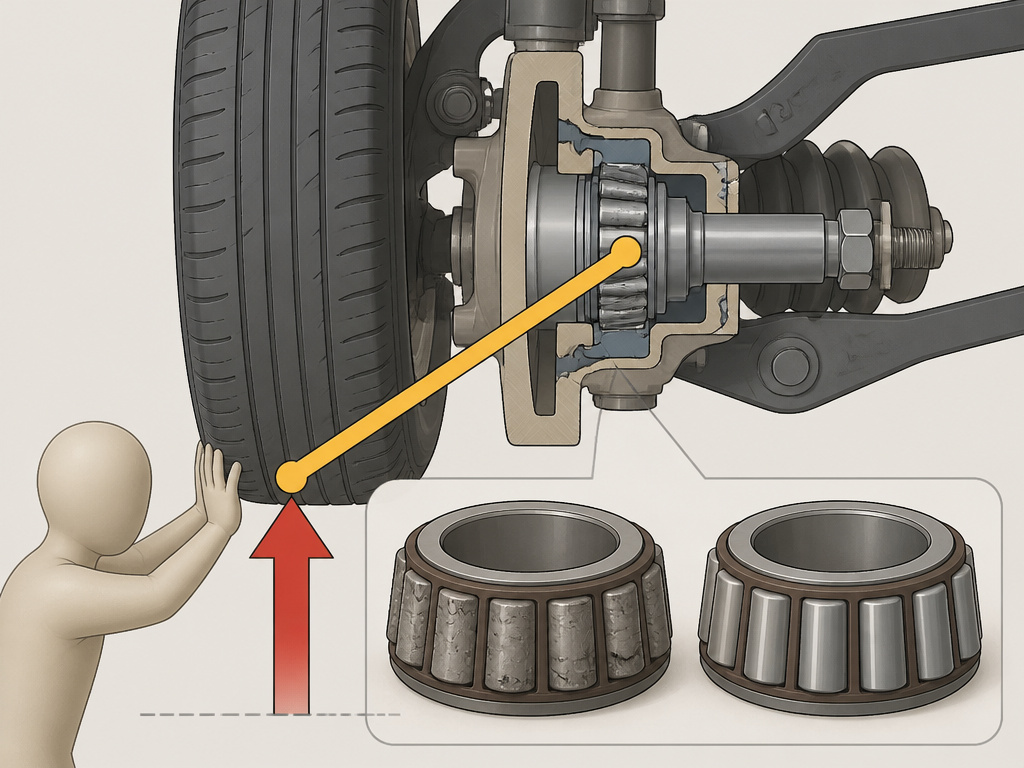
Spacers change your wheel’s offset, pushing it outward. This moves the center of the tire’s contact patch farther from the wheel bearing. Physics treats this as a longer lever arm. The force from the road hitting the tire now has more leverage to twist and load the bearing.
The result is predictable: your wheel bearings will wear out faster. How much faster? On a daily-driven car, you might cut a 60,000-mile bearing lifespan down to 40,000 miles. The first sign is a low humming or growling noise that changes with vehicle speed. Ignore it, and it becomes a grinding roar, followed by play in the wheel, and eventually bearing seizure.
This is a direct consequence of the geometry change. If you install spacers, add “bearing inspection” to your routine maintenance.Listen for new noises after installation.
Buying a Safe 1-Inch Spacer: The Spec Sheet Decoder
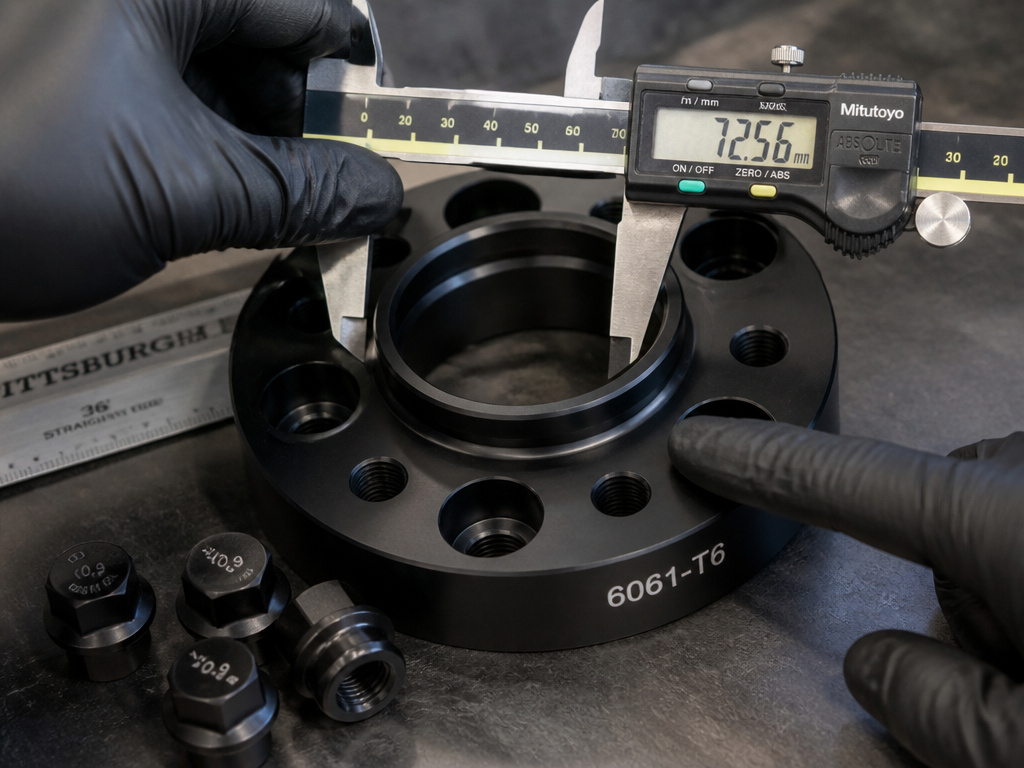
Walking into a store or clicking “buy” online requires a checklist. “Universal fit” is a red flag. You need vehicle-specific parts.
Material: The spacer must be made from forged 6061-T6 aluminum or, for the highest stress applications, magnetic steel as specified in SFI Specification 44.1 for racing spacers. Avoid cast aluminum, it can have microscopic pores that become crack initiation points under cyclic load.
Hub Bore: This number is critical. It must match your vehicle’s hub diameter exactly. For a BMW, that’s often 72.56mm. For a Ford truck, it’s 87.1mm. A variance of even 0.5mm means the spacer is lug-centric, placing all the centering stress on the studs. The finish should be machined, not painted where it contacts the hub.
Hardware: The included lug nuts or bolts must be the correct seat type (conical, ball, mag) for your wheels. Using the wrong seat is another direct path to torque loss. Quality kits from brands like Eibach or BONOSS include the correct hardware.
Here is what to inspect when your spacer arrives. If it fails any of these, send it back.
| Checkpoint | What to Look For | Consequence If Wrong |
|---|---|---|
| Center Bore | Machined finish, precise diameter matching your vehicle’s hub (e.g., 70.3mm). | Vibration, lug-centric load, stress cracks around stud holes. |
| Mounting Surfaces | Perfectly flat. Use a straightedge. No paint or coating where metal contacts hub or wheel. | Uneven clamping, warping, false torque reading, slow loosening. |
| Integrated Studs | Grade 10.9 or higher marking, clean threads, pressed-in (not just screwed in). | Studs can shear under load, leading to immediate wheel detachment. |
| Material Marking | “6061-T6” or “SFI 44.1” etched or stamped. No “cast” markings. | Material fatigue, catastrophic cracking under hard cornering or impact. |
The Installation Ritual: More Than Just Torquing Nuts
Safe installation is a clean, methodical process. Your goal is metal-on-metal contact with no compromises.
Step 1: Clean everything. The hub face, the back of the spacer, the wheel mounting surface, and every thread on every stud must be free of rust, dirt, and old paint. Use a wire brush and brake cleaner. Dirt or corrosion between surfaces acts as a lubricant, causing torque to drop as it compresses over the first 100 miles.
Step 2: Test fit the spacer dry. Place it on the hub. It should slide on snugly and sit flush without you forcing it. If it rocks or doesn’t seat fully, the bore is wrong or there’s an obstruction like a retaining clip. Many older GM trucks have a spring clip on the hub that must be removed.
Step 3: Torque in stages with a calibrated wrench. Bolt the spacer to the hub using your factory lug nuts or the provided hardware. Follow the vehicle manufacturer’s torque specification (usually 88-100 ft-lbs for a passenger car). Tighten in a star pattern, go around twice. Then mount the wheel to the spacer’s studs and torque those nuts to the same spec, again in a star pattern.
Step 4: The 100-mile retorque. This is not optional. Drive the car normally for about 100 miles. Then, with the wheels cool, remove each lug nut one at a time, apply a single drop of oil to the threads (never on the conical seat), and retorque to spec. This settles all the components and takes up any microscopic compression.
Skipping the retorque is where many “it was fine until…” stories begin. The metals bed in, and torque can drop by 10-15%.
Frequently Asked Questions
Do I need extended studs for 1-inch spacers?
In almost every case, yes. You need them for the hub side if using a bolt-on spacer, to ensure the spacer itself is clamped securely. You definitely need them if using any slip-on spacer over 5mm thick. The rule is visual: after assembly, you should see the stud’s diameter worth of threads (about 1/2 inch) protruding past the lug nut.
Are wheel spacers legal where I live?
Legality hinges on two things: whether they cause the wheels to protrude beyond the fenders (often illegal), and whether they are explicitly banned. Most regions adopt rules similar to Australia’s NSW RMS, allowing them but capping track width increase. The safest approach is to check your local vehicle code, look for sections on “wheel track” or “track width modification.”
How do spacers affect my vehicle’s handling?
They widen your track, which generally increases stability in corners by reducing body roll. However, they also increase steering effort slightly and can make the steering feel less precise on-center, as the scrub radius changes. The effect is subtle on a street car but noticeable on a track-focused vehicle.
Can I use spacers with my factory alloy wheels?
Yes, but you must ensure the spacer’s thickness doesn’t cause the wheel to contact the fender or suspension components at full lock or compression. You also must ensure the spacer’s integrated studs or your new extended studs don’t bottom out inside a deep well on the back of the wheel.
How often should I check the torque on my spacers?
After the initial 100-mile retorque, check them every time you rotate your tires (typically every 5,000-7,000 miles). Also check them immediately after any impactful event, like hitting a massive pothole or curb. A clicking sound when you start moving or brake is a telltale sign something has loosened.
The Bottom Line
A one-inch wheel spacer is a significant mechanical modification, not a cosmetic accessory. Its safety depends entirely on respecting the hard rules of thread engagement and hub-centric fitment. The federal guideline is clear: one full stud diameter of engaged threads is the floor, not a suggestion.
If you follow that rule, using quality hub-centric wheel spacers from brands like BONOSS or Eibach, installing the necessary extended wheel studs, and adhering to a strict torque and inspection routine, you can run them reliably. You trade that reliability for the known, accelerated wear of your wheel bearings and place yourself outside official engineering endorsements.
For many, the improved stance or needed clearance is worth that trade and maintenance burden. For others, the smarter long-term play is to sell the current wheels and buy a new set with the correct offset, eliminating the extra interface entirely. Your call depends on how much you trust your own mechanical diligence.
